Troubleshooting Common Issues in Procreate: Solutions for Beginners
Procreate has revolutionized digital art creation, providing a powerful platform for artists to unleash their creativity on iPads. However, like any software, it's not immune to occasional glitches or hiccups.
For beginners learning to create digital art with Procreate, encountering technical issues can be frustrating and discouraging. But fear not! In this blog post, we'll explore some common problems faced by beginners in Procreate and provide simple solutions to help you overcome them.
Want to learn about Procreate in step-by-step video lessons? In my class, Procreate for Beginners, I cover everything you need to know from start to finish!
Brush Lag
One of the most common complaints among Procreate users is brush lag, where the strokes appear delayed or sluggish.
Adjust brush settings
Some brushes, especially those with complex textures or effects, may cause lag. Experiment with different brush settings. You can do this by tapping on the brush panel, selecting the brush of your choice, and moving the settings around. Usually, adjusting the Stabilization fixes the issue.
Important Note: If you do experiment with the brush settings, make sure to duplicate the brush first so that you still have access to the original settings and rename the modified brush to prevent confusion.
Close other apps
Running multiple apps in the background can consume resources and slow down Procreate. Close unnecessary apps to free up memory and improve performance.
Exporting Issues
After creating a masterpiece in Procreate, you may encounter difficulties exporting your artwork in the desired format or quality.
Check file format
Ensure that you're exporting your artwork in a compatible file format, such as JPEG or PNG. Procreate supports various file formats, so choose the one that suits your needs.
Adjust resolution
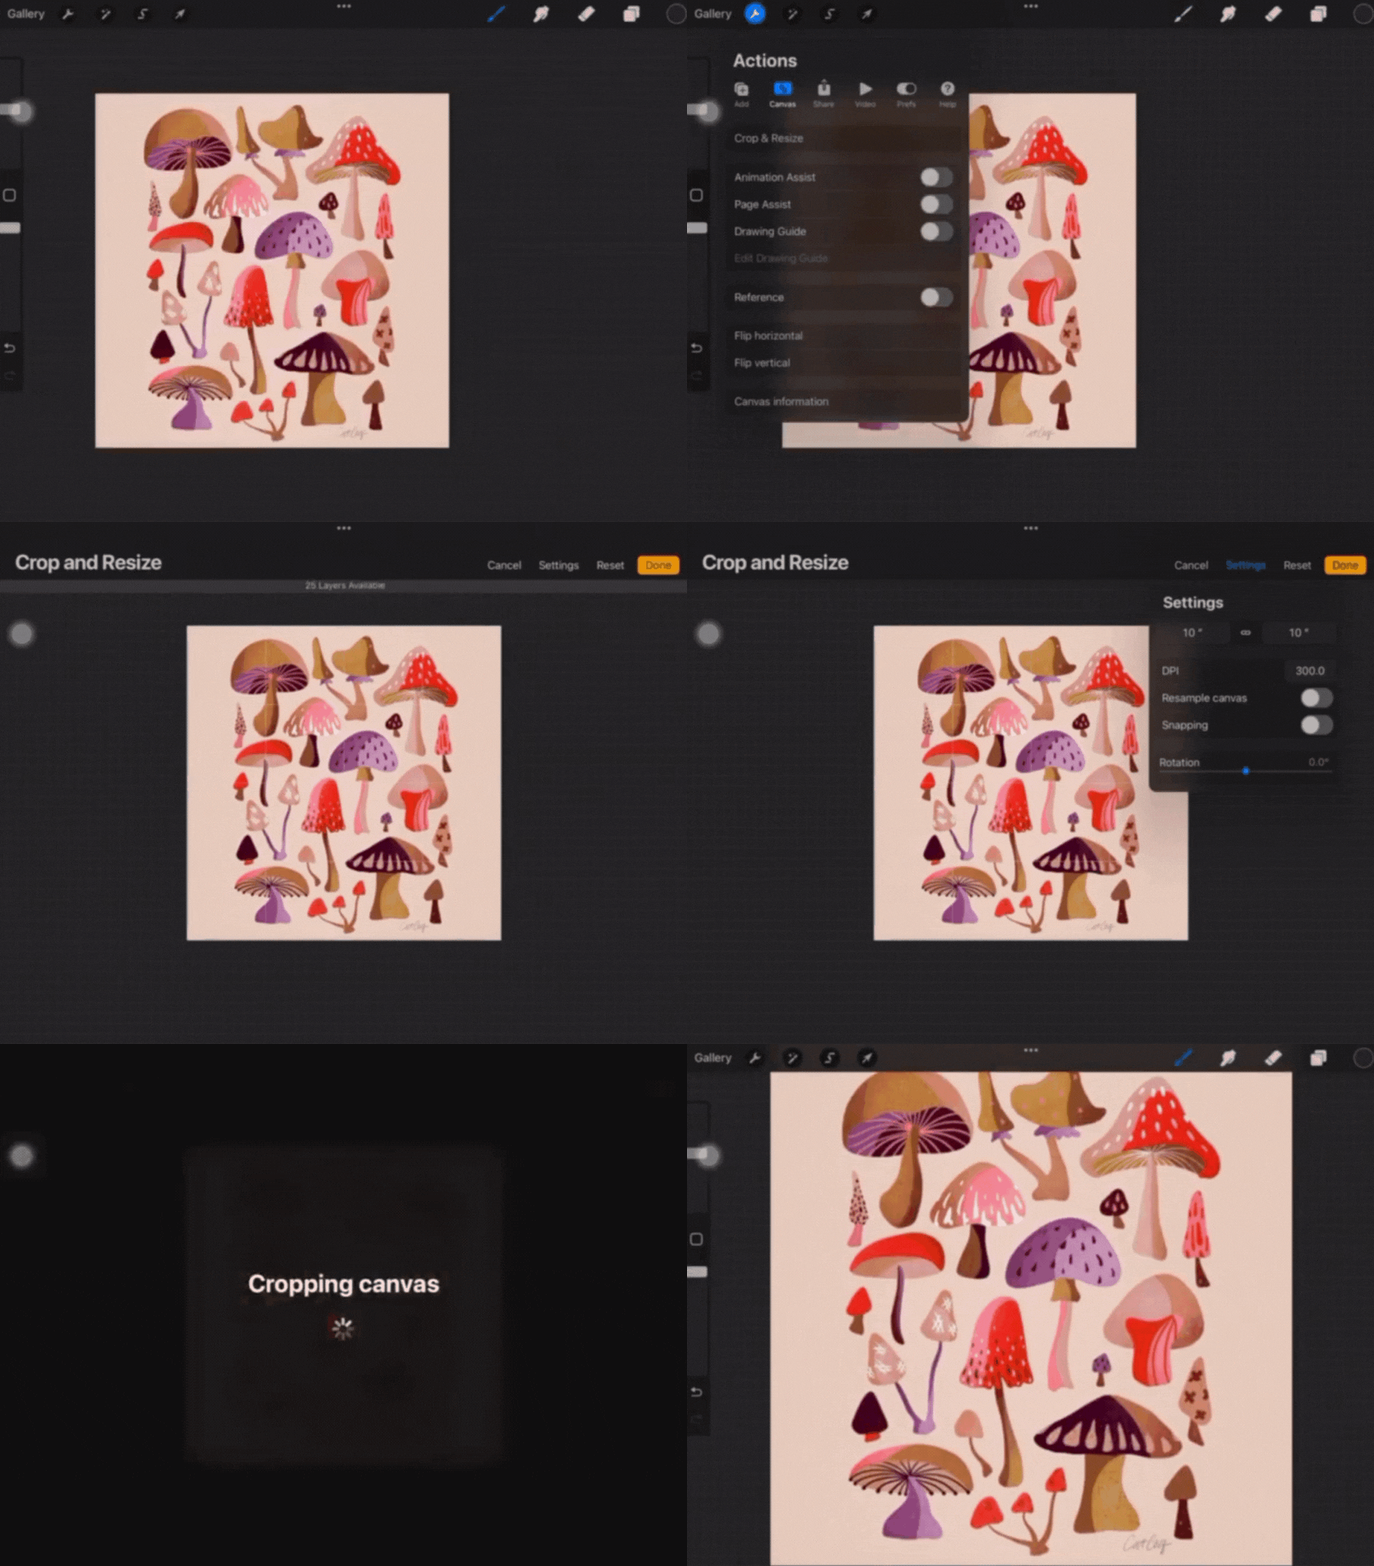
High-resolution illustrations may take longer to export and consume more storage space. Consider reducing the resolution or using Procreate's built-in export options to optimize file size. Important Note: Be careful with adjusting the resolution of your illustration if you plan to print it on large products. Check out this blog post about Procreate file sizes for more tips.
If you want to experiment with adjusting the size of your illustration to troubleshoot exporting issues, make sure to make a copy of the illustration first so you don’t lose your hard work at the higher resolution!
To adjust the resolution, tap on the Settings icon (wrench icon), select Canvas, tap on Crop & Resize, then adjust the resolution.
Update Procreate
Sometimes, exporting issues can be caused by bugs or compatibility issues in older versions of Procreate. Make sure you're using the latest version of the app to access the latest features and bug fixes.
Accidentally locking layers
Artists use the Lock Layer feature to prevent accidental modifications. Locking your layers safeguards your artwork from unwanted changes. However, accidentally locking a layer prevents you from working on your design.
You can unlock your layer by going to the Layers panel, swiping left on the locked layer, then tapping on “Unlock”.
Moving the wrong layer
Managing multiple layers can be tricky at first. If you find yourself in the situation where you seem to keep moving or selecting the wrong element – then there’s a big chance that you’re on the wrong layer.
Take your time when selecting layers to move and double-check before making any changes to avoid accidentally moving the wrong layer. You can simply open the Layers panel and take a good look at the selected layer.
Brush Transparency
What do you do when your brush suddenly becomes translucent, affecting the opacity of strokes and making it difficult to control?
Check brush settings
Ensure that the brush opacity and flow settings are adjusted to your desired levels. Sudden changes in opacity may be due to unintentional adjustments.
You can find the Brush Opacity Setting on the left side of your screen by default, but if you have the Right-hand Interface turned on, you can find it on the right side of your screen. It is the second slider right below the Brush Size Slider.
Accidental Use of Clipping Mask or Alpha Lock
The clipping mask and alpha lock tools allow you to draw within a shape's boundaries by locking a layer's transparency.
Undo action
If you accidentally apply a Clipping Mask or Alpha Lock, you can undo the action by tapping two fingers on your canvas.
Check Layer Settings
Another way to remove a Clipping Mask or deactivate the Alpha Lock feature is to open the Layers Panel, tap on the layer to activate the menu, see if the Clipping Mask or Alpha Lock features are activated (indicated by a check beside them), then tap on these options to deactivate.
Procreate is a powerful tool for digital artists, but like any software, it's not without its challenges. By understanding and troubleshooting common issues, beginners can overcome obstacles and explore their creativity with confidence.
Whether it's brush lag, exporting difficulties, layer management woes, or unexpected changes in brush behavior and layer settings, there are simple solutions available to help you navigate Procreate and create stunning artwork on your iPad. Don't let technical issues hold you back!
Dive deeper into Procreate with my Procreate Bundle!
Want to learn how to use Procreate to create professional illustrations? My Procreate Bundle will take you from beginner to surface design professional through three fun, hands-on courses! Click here to check it out and learn more.


