Digitizing Artwork: How to Fuse Two Scans Together in Photoshop
In this tutorial, I’m going to share my process for fusing two scans together when you’re digitizing your artwork.

When I paint, I prefer to use 11”x15” paper. This allows me enough room to spread out and utilize the page if I’m painting a detailed motif. The only problem is, that my scanner bed is 8”x10”. This means that in order to scan my larger paintings, I have to scan them in two pieces. But after years of honing my art digitizing skills, I’ve come up with a system that allows me to easily fuse the two scans into one seamless image in Photoshop. If you’ve ever wondered how to do this, follow along as I go through my process step-by-step.
First things first, if you’re unfamiliar with the scanning process, check out this blog post that goes in-depth into the scanner settings, DPI, and my tips for getting a good scan.
If you’d like a scanner recommendation, I use this Epson scanner for digitizing all of my artwork!
Step 1: Scanning
Fusing your scans together in Photoshop is going to be much easier if you set a good foundation when you scan the artwork. It’s really important to align the edge of your paper with the edge of the scanner. This will ensure that each of your scans is digitized at the same angle.

After the first section of the scan is complete, push your artwork forward and align the bottom of the page with the edge of the scanner before starting the second scan. You want to make sure each section is scanned in at the same orientation so that when you go to fuse them together they are easier to line up and turn into one image.

Step 2: Open the files in Photoshop
After you’ve scanned your painting the next step is to open it in Photoshop. When I’m digitizing my artwork, I start with what I call a “template file.” This file is usually sized at 31”x42”.
The reason for such a large file size is that I digitize my artwork to sell via print-on-demand sites. A 31x42-inch artboard is large enough that the digital file I create will be able to scale to large products like shower curtains and bedding without losing resolution. It can also be scaled down to smaller standard sizes to fit on wall art and other smaller products.

Open your 31x42 inch Photoshop file, and we’ll pull the scans in from there. Drag the scans from wherever they are located on your computer into Photoshop. Make sure to drag them on top of the Photoshop icon and not into your artboard directly as it likely has a different DPI than your scanned image.
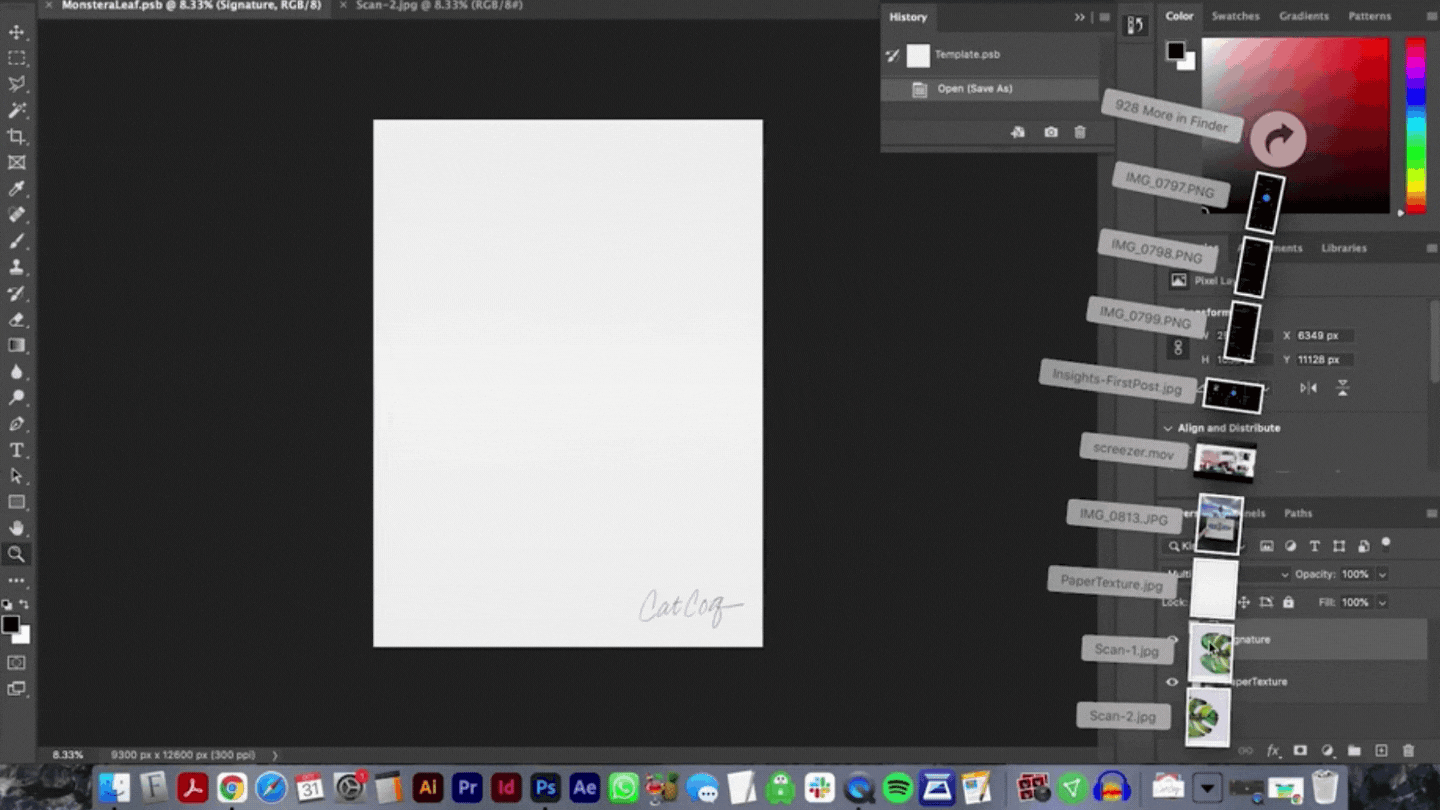
Once both of your scanned images are in Photoshop, pull the two tabs apart.

Now, use the move tool (keyboard shortcut: “v”) to drag each of these into your main Photoshop artboard.

Now you can close out the original tabs from each scan since we’ll just be working in this one main file. You’ll see that your layers panel now includes two new layers - one for each section of the scan.

The last step before we start fusing the scans is to orient them so they are facing the right direction. Since they were scanned in sideways, we need them to be facing upright. To do this, click one of the layers with your scan on it, hold down shift, and click the other layer.

Then grab the transform tool (keyboard shortcut: “cmd + t”).

Hold down shift while you rotate the scanned images and it will snap to 15 degree increments. This gives you more control and ensures that your scan is moving precisely where you want it to.
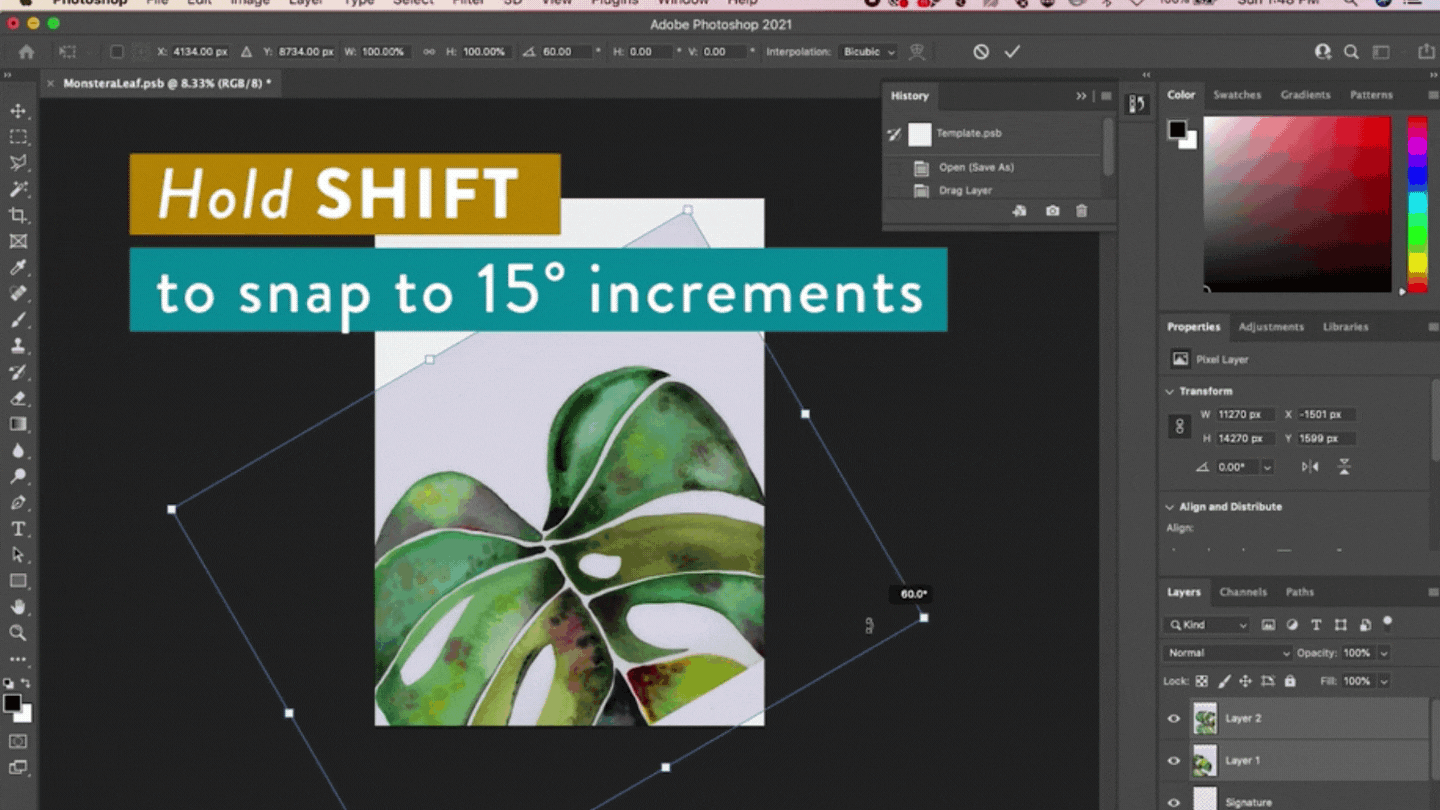
If needed, you can make your artwork smaller to make sure it fits within the artboard. With the transform tool still selected, grab the corner and size it down to fit. Note that this time, you should not hold down shift. If you do hold down shift, you won’t have control of the locked in proportions, so your image can get warped from its original state. If you don’t it will stay in the same proportions it was as you originally painted it, which is what we want.
To recap: do hold shift while rotating, but don’t hold shift while resizing. 😊

When you get your painting to a size that you like, hit Enter to set the transformation.
Step 3: Aligning the two scans
Now, both of your layers should still be selected, but the top layer is covering the bottom one. With both of the layers selected, go to the dropdown menu that says “Normal” in your layers panel and change it to “Multiply.” What this does is changes the transparency effect on these images so that we can see what we’re doing as we move them and fuse them into one image.

Now click the layer with the bottom part of the scan so that it’s the only layer selected. We’re going to move it so that it’s flush with the top layer. Select your transform tool (keyboard shortcut: “t”) and drag the bottom part of the painting down so that it’s close to where it’s supposed to be in line with the top layer. This doesn’t have to be perfect, but we do want to make sure that it’s generally in the right spot. We’ll make sure it’s perfectly aligned in the next steps.

Now, let’s make sure it’s aligned perfectly! Zoom in on your illustration and you should be able to see where it’s a little off. Use the arrow keys on your keyboard to move the illustration so that it’s lined up perfectly.

At first glance, it may look like it’s lined up, but I always recommend zooming in again to make sure that it’s as tight as possible. This example is subtle, but you can tell that they are completely aligned in the end!

This illustrates how important it is to make sure that your paper is flush with the edge of the scanner while you’re scanning. Being even the tiniest bit off would make it much harder to line these two scans up in Photoshop.
When you’re happy with how your scans have lined up, hit Enter to set the transformation.

Step 4: Turn the two scans into one image
Now it’s time to fuse the two images together! To start, grab your marquee tool (keyboard shortcut: “m”).

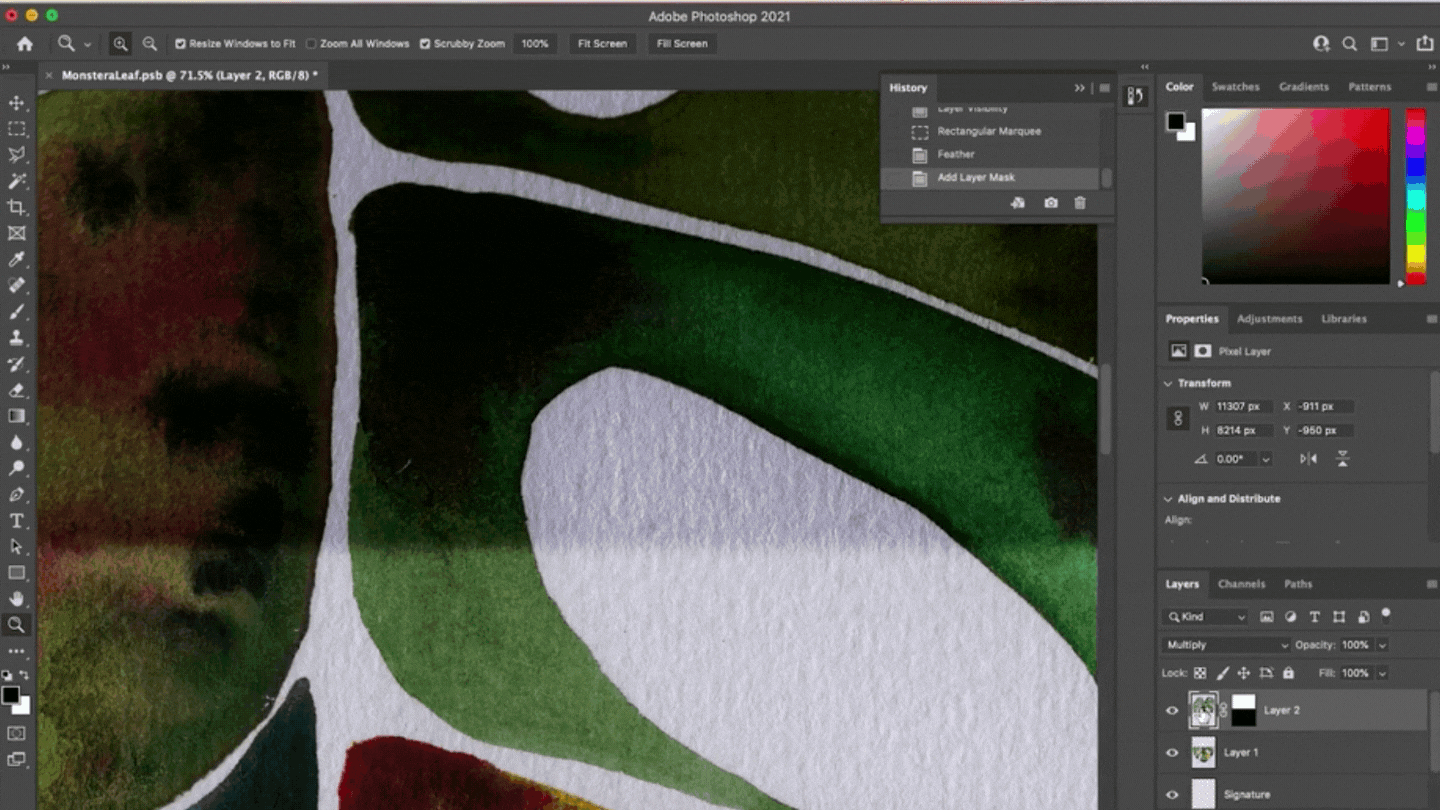
Make sure that the layer with the top part of the illustration is selected. Then, using the rectangular marquee tool, click and drag a box over the top of the illustration and end the selection about halfway through the area where the two layers overlap.

Now click Select → Modify → Feather and feather this selection by 20 pixels.

The reason for feathering is that instead of having the illustrations cut in half with a straight edge, we want them to have a more feathered and natural look. This is the key to making sure that the two scans look like one as we fuse them.
Now, we’re going to add a mask to this layer to cut out the part of the illustration that’s overlapping with the other scan. To do this click the mask icon at the bottom of the Layers panel.

Now you can see the effect of the 20-pixel feathering we did in the previous step. It produced a blurred line between the two images instead of a sharp edge.

As you can see there is still a dark area where the two images are overlapping. The reason for this is that we still have the “Multiply” blending mode turned on from an earlier step. To turn this off, hold down shift and select both layer thumbnails. Then click the “Multiply” dropdown and change it back to “Normal.”
Now when you zoom out you can see that it’s come together into a single, seamless image.

After giving everything a final check to make sure that it’s lined up how you want it, you can merge these two layers together. To do that, select both layers while holding shift. Then merge the layers by hitting “cmd + E” on your keyboard or clicking the Layers menu → Merge.

And there you have it! Now that your scans are merged you can move on to other digitizing steps like removing the background, removing any blemishes, and adding a digital paper background.
If you want to get step-by-step guidance on my entire process for taking my artwork from paper to screen to products, check out my class, Digitize Your Art to Sell Online. In this in-depth class, I share everything I’ve learned about digitizing artwork as a professional surface designer.

More CatCoq Classes

Digitize Your Art to Sell Online
In this class, you’re going to learn the step-by-step process of digitizing and enhancing your analogue artwork specifically for print-on-demand sales. Think of this as the advanced version of this blog post!

Step-by-Step Guide to Art Licensing
This class is filled with actionable steps that help you make your first sale with artwork online, as well as boosting your sales if you’re already selling.
Hand-painted Seamless Patterns in Photoshop
In this class, you’ll learn the full process for creating seamless patterns with hand-painted designs, from watercolor painting to arranging your pattern on your computer, so you can sell your designs online through print-on-demand.