How to Upload Your Designs to Print on Demand Sites - Society6, Redbubble, and Spoonflower
In this tutorial, I’ll walk you through my upload process for print on demand sites. My top print on demand sellers are Society6, Redbubble, and Spoonflower, so in this tutorial, I’ll walk through how you can upload your designs to those sites. I know that uploading your designs can feel like an overwhelming process, but it doesn't have to be! Once you get some practice with it, the process will become more streamlined and sustainable. In this tutorial, I’ll share my best tips for simplifying the upload process so you can focus more on what you love - creating your art!
Print on demand was how I got my start as a professional surface designer, and if you’re wondering how to sell your art online, this is a great way to get started! I won’t be walking through how to set up a shop in this tutorial, but setting up a shop is a super simple process. On the homepage for each of these sites, you’ll see a button that says either “Join” or “Sell Your Art.” That will get you started setting up your shop!
If you want to learn more about how to use print on demand as a way to make money with your art, check out my in-depth class, A Step-by-Step Guide to Art Licensing: Sell Your Art With Print On Demand, where I take you through the entire process from creating strategic art that will sell, to setting up your shop, and more! This is everything I wish I knew when I was getting started with print on demand. And you can join the class for free with this link which grants you a free month trial to Skillshare!
Now let’s dive into learning how to upload your designs!
A quick note here about patterns. My portfolio is comprised of about half seamless patterns and half standalone artwork. There are certain products on all print on demand sites that require a seamless pattern block for the design. One example is wallpaper. Since wallpaper covers a large amount of space, it needs to be set up with a pattern block so that all of the wallpaper panels fit together seamlessly. In each of the upload processes, I’ll share how to upload both seamless pattern blocks and standalone art.
Today we’ll dive into the upload process for three different sites. If you’re looking for instructions for one of them in particular just click the button to jump to that section!
How to Upload Designs on Society6
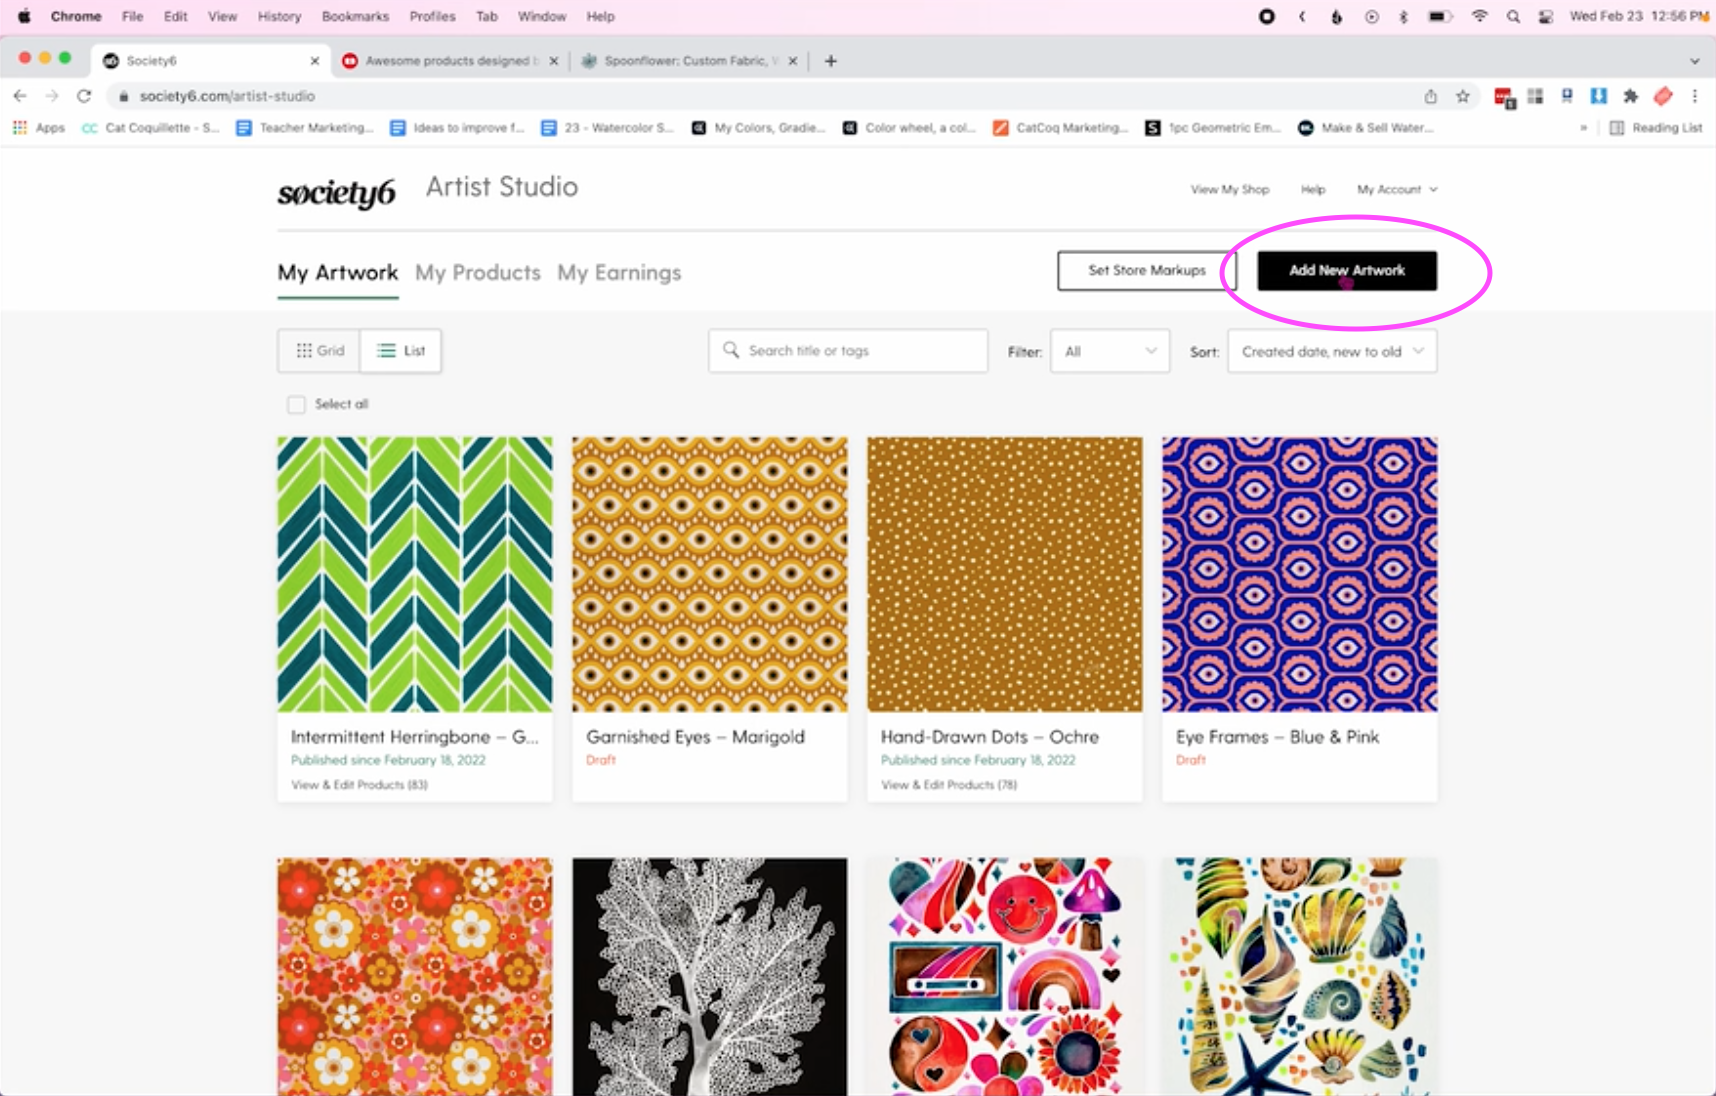
To start uploading designs to Society6, click “Sell” in the top right corner.

Next, click “Add New Artwork.”
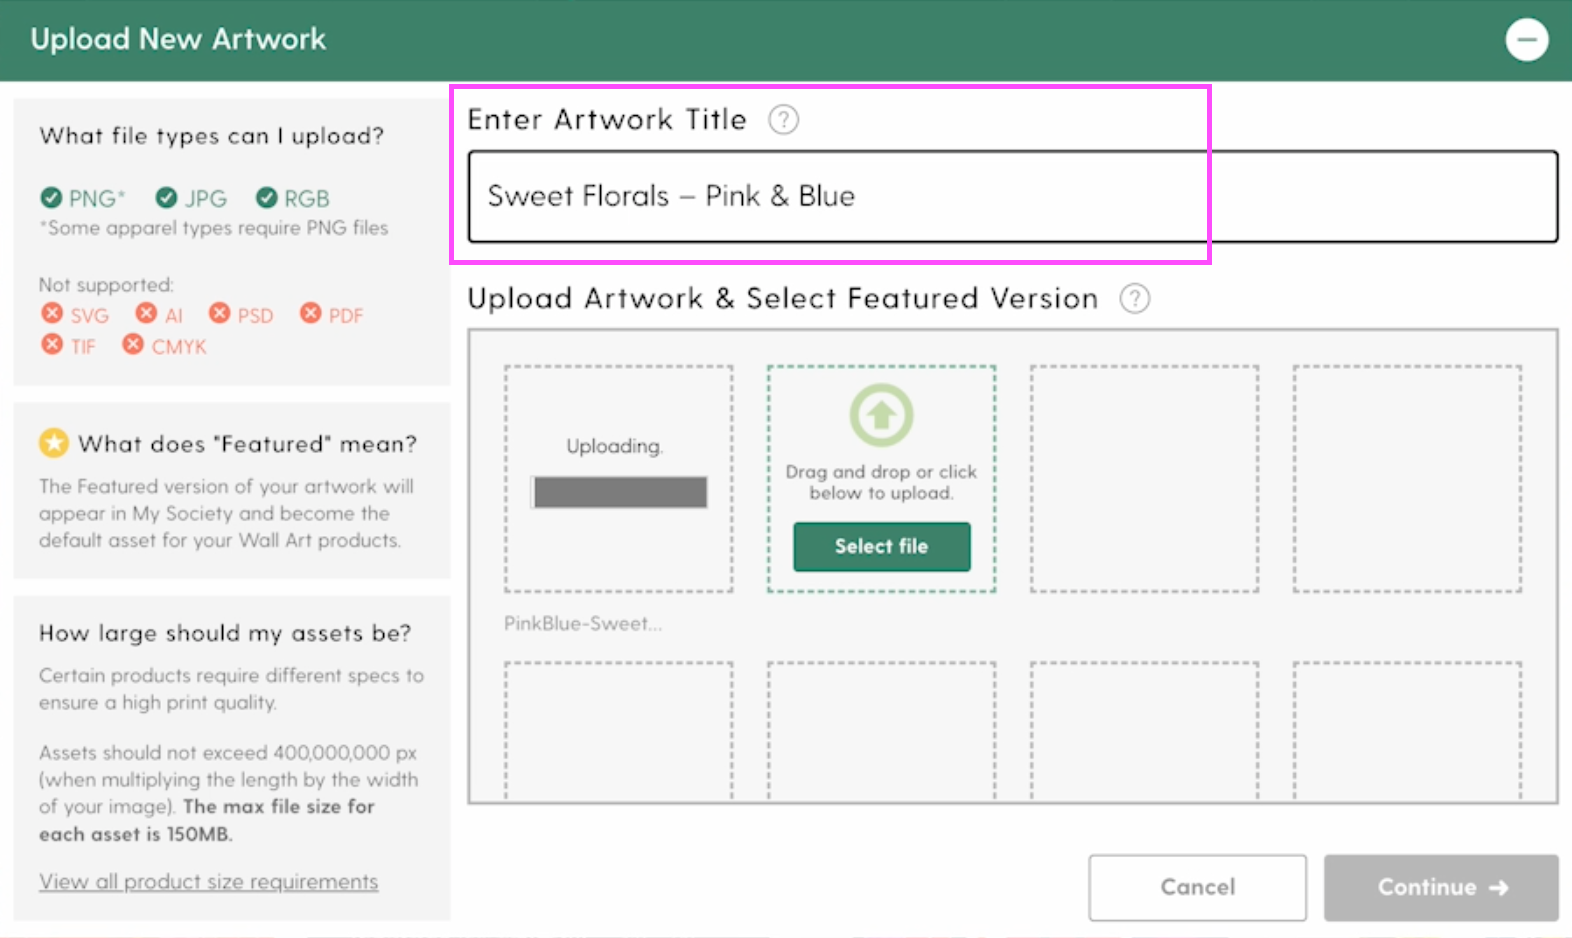
Then, select a file to upload. The only Society6 product that requires a seamless pattern block is wallpaper. So even if I’m uploading a seamless pattern, I’ll upload the full pattern file (a high res stacked version of the pattern), not the pattern block (the block used to make the pattern repeat seamlessly).
This gives me more flexibility on the rest of the products, and I can upload the pattern block separately for wallpaper. I’ll show you how to do that a little later on. For now, select your artwork to upload. Make sure that the file is high res so that it can scale up without losing resolution on larger products like yoga mats and shower curtains.
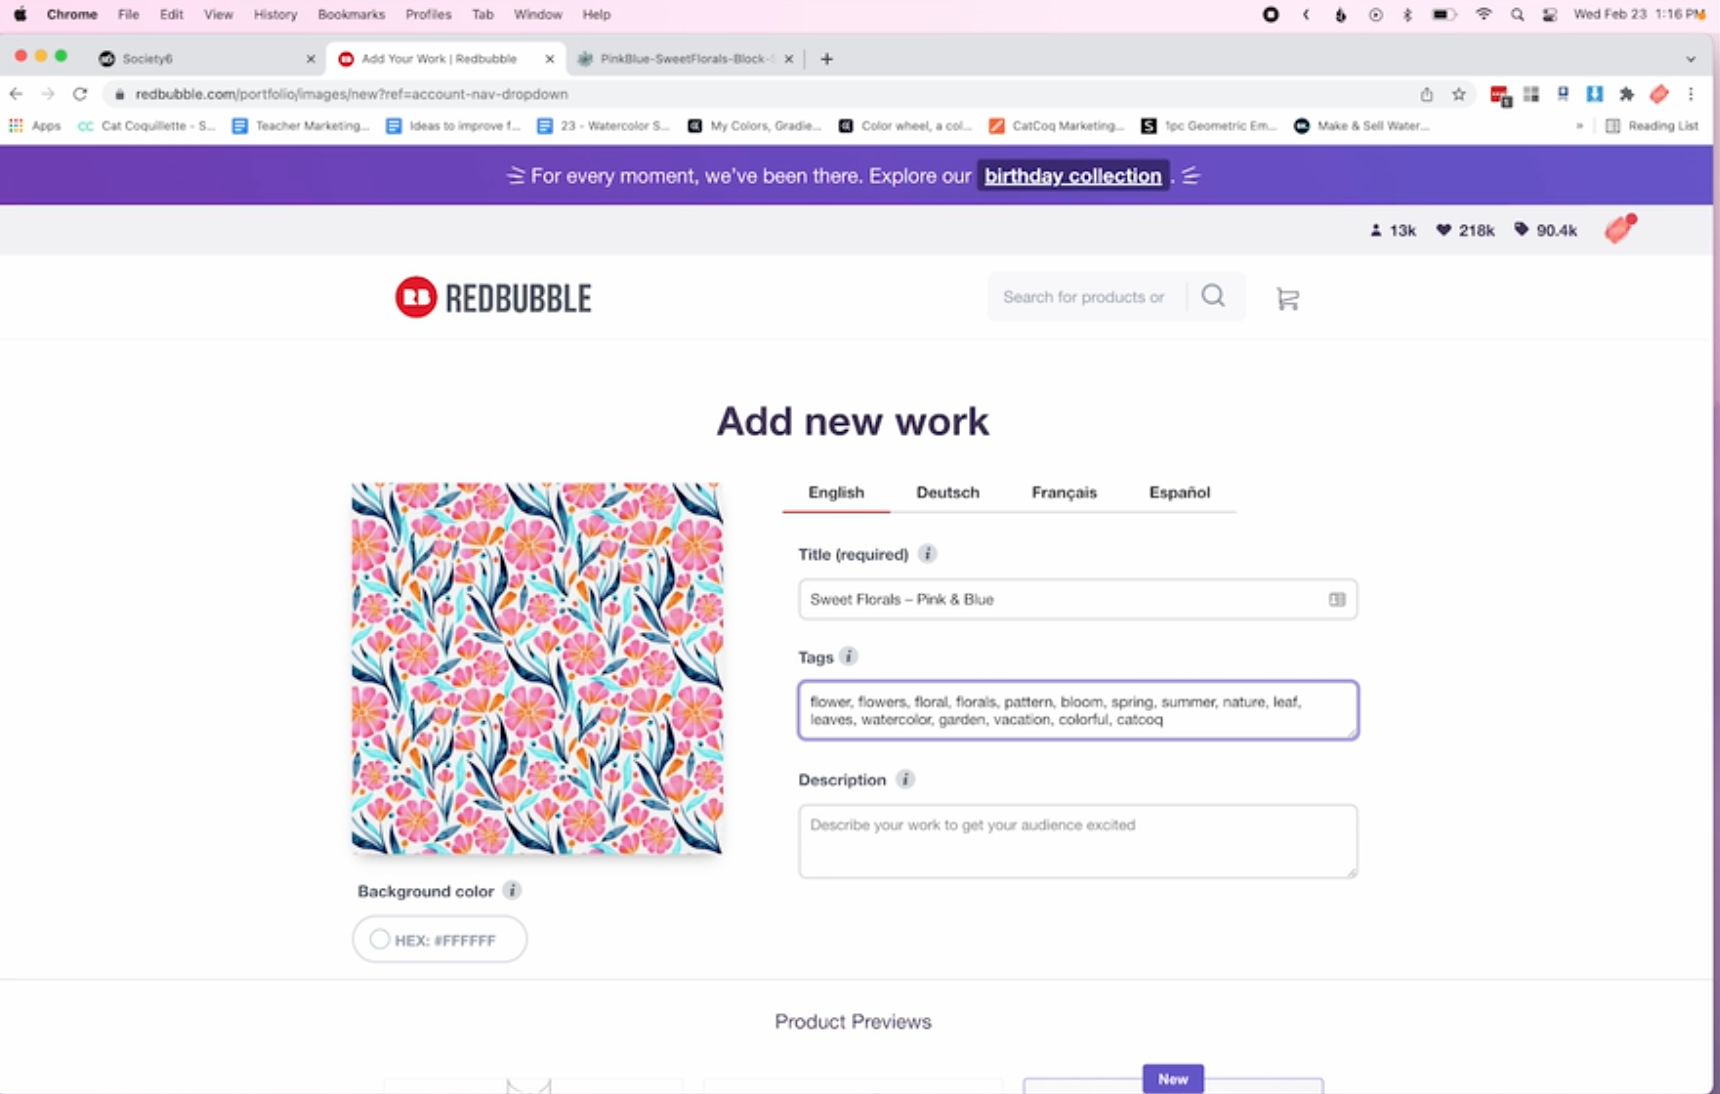
Once you’ve selected your file, enter a title for your artwork.
It can take a little while for the files to upload, especially if they’re really high-res. So I have a time-saving trick for this. While I’m waiting for my Society6 upload, I start the upload process on both Redbubble and Spoonflower as well. This workflow has saved me a lot of time, and is a great way to keep the upload process going while you’re waiting for the files to upload!
When you check back to see that your work is uploaded, you will see the artwork thumbnail and you can click “Continue.”

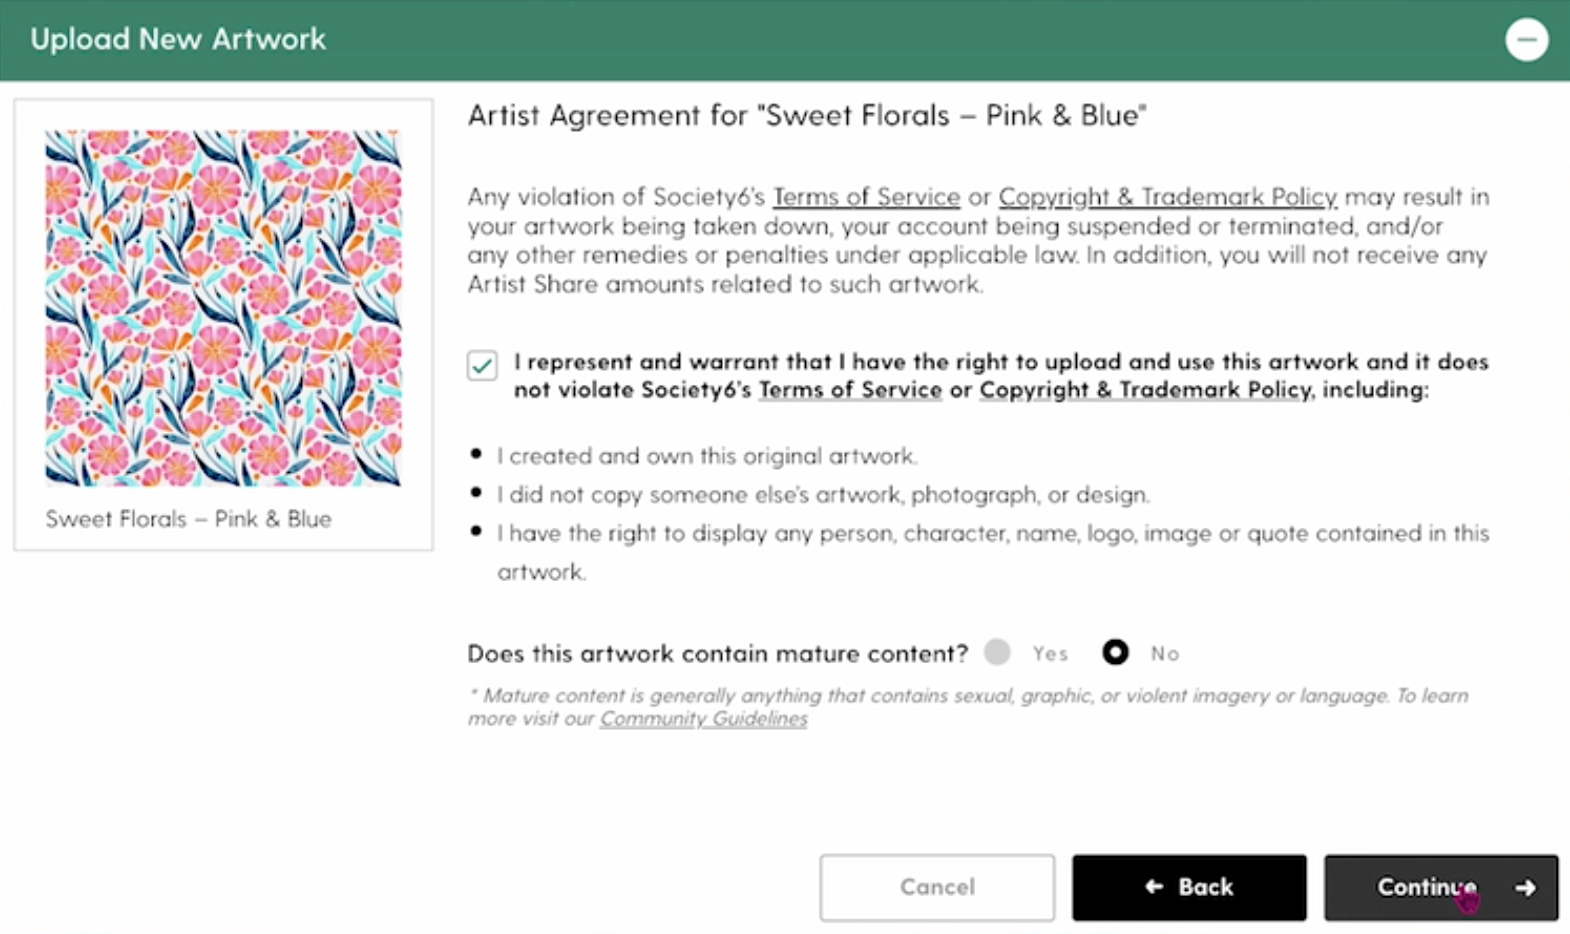
Next, you’ll see an Artist Agreement pop up. This is where you’ll confirm that this is your work and you have the copyright to sell it. You also will need to indicate whether or not your work contains mature content. Then, click continue!
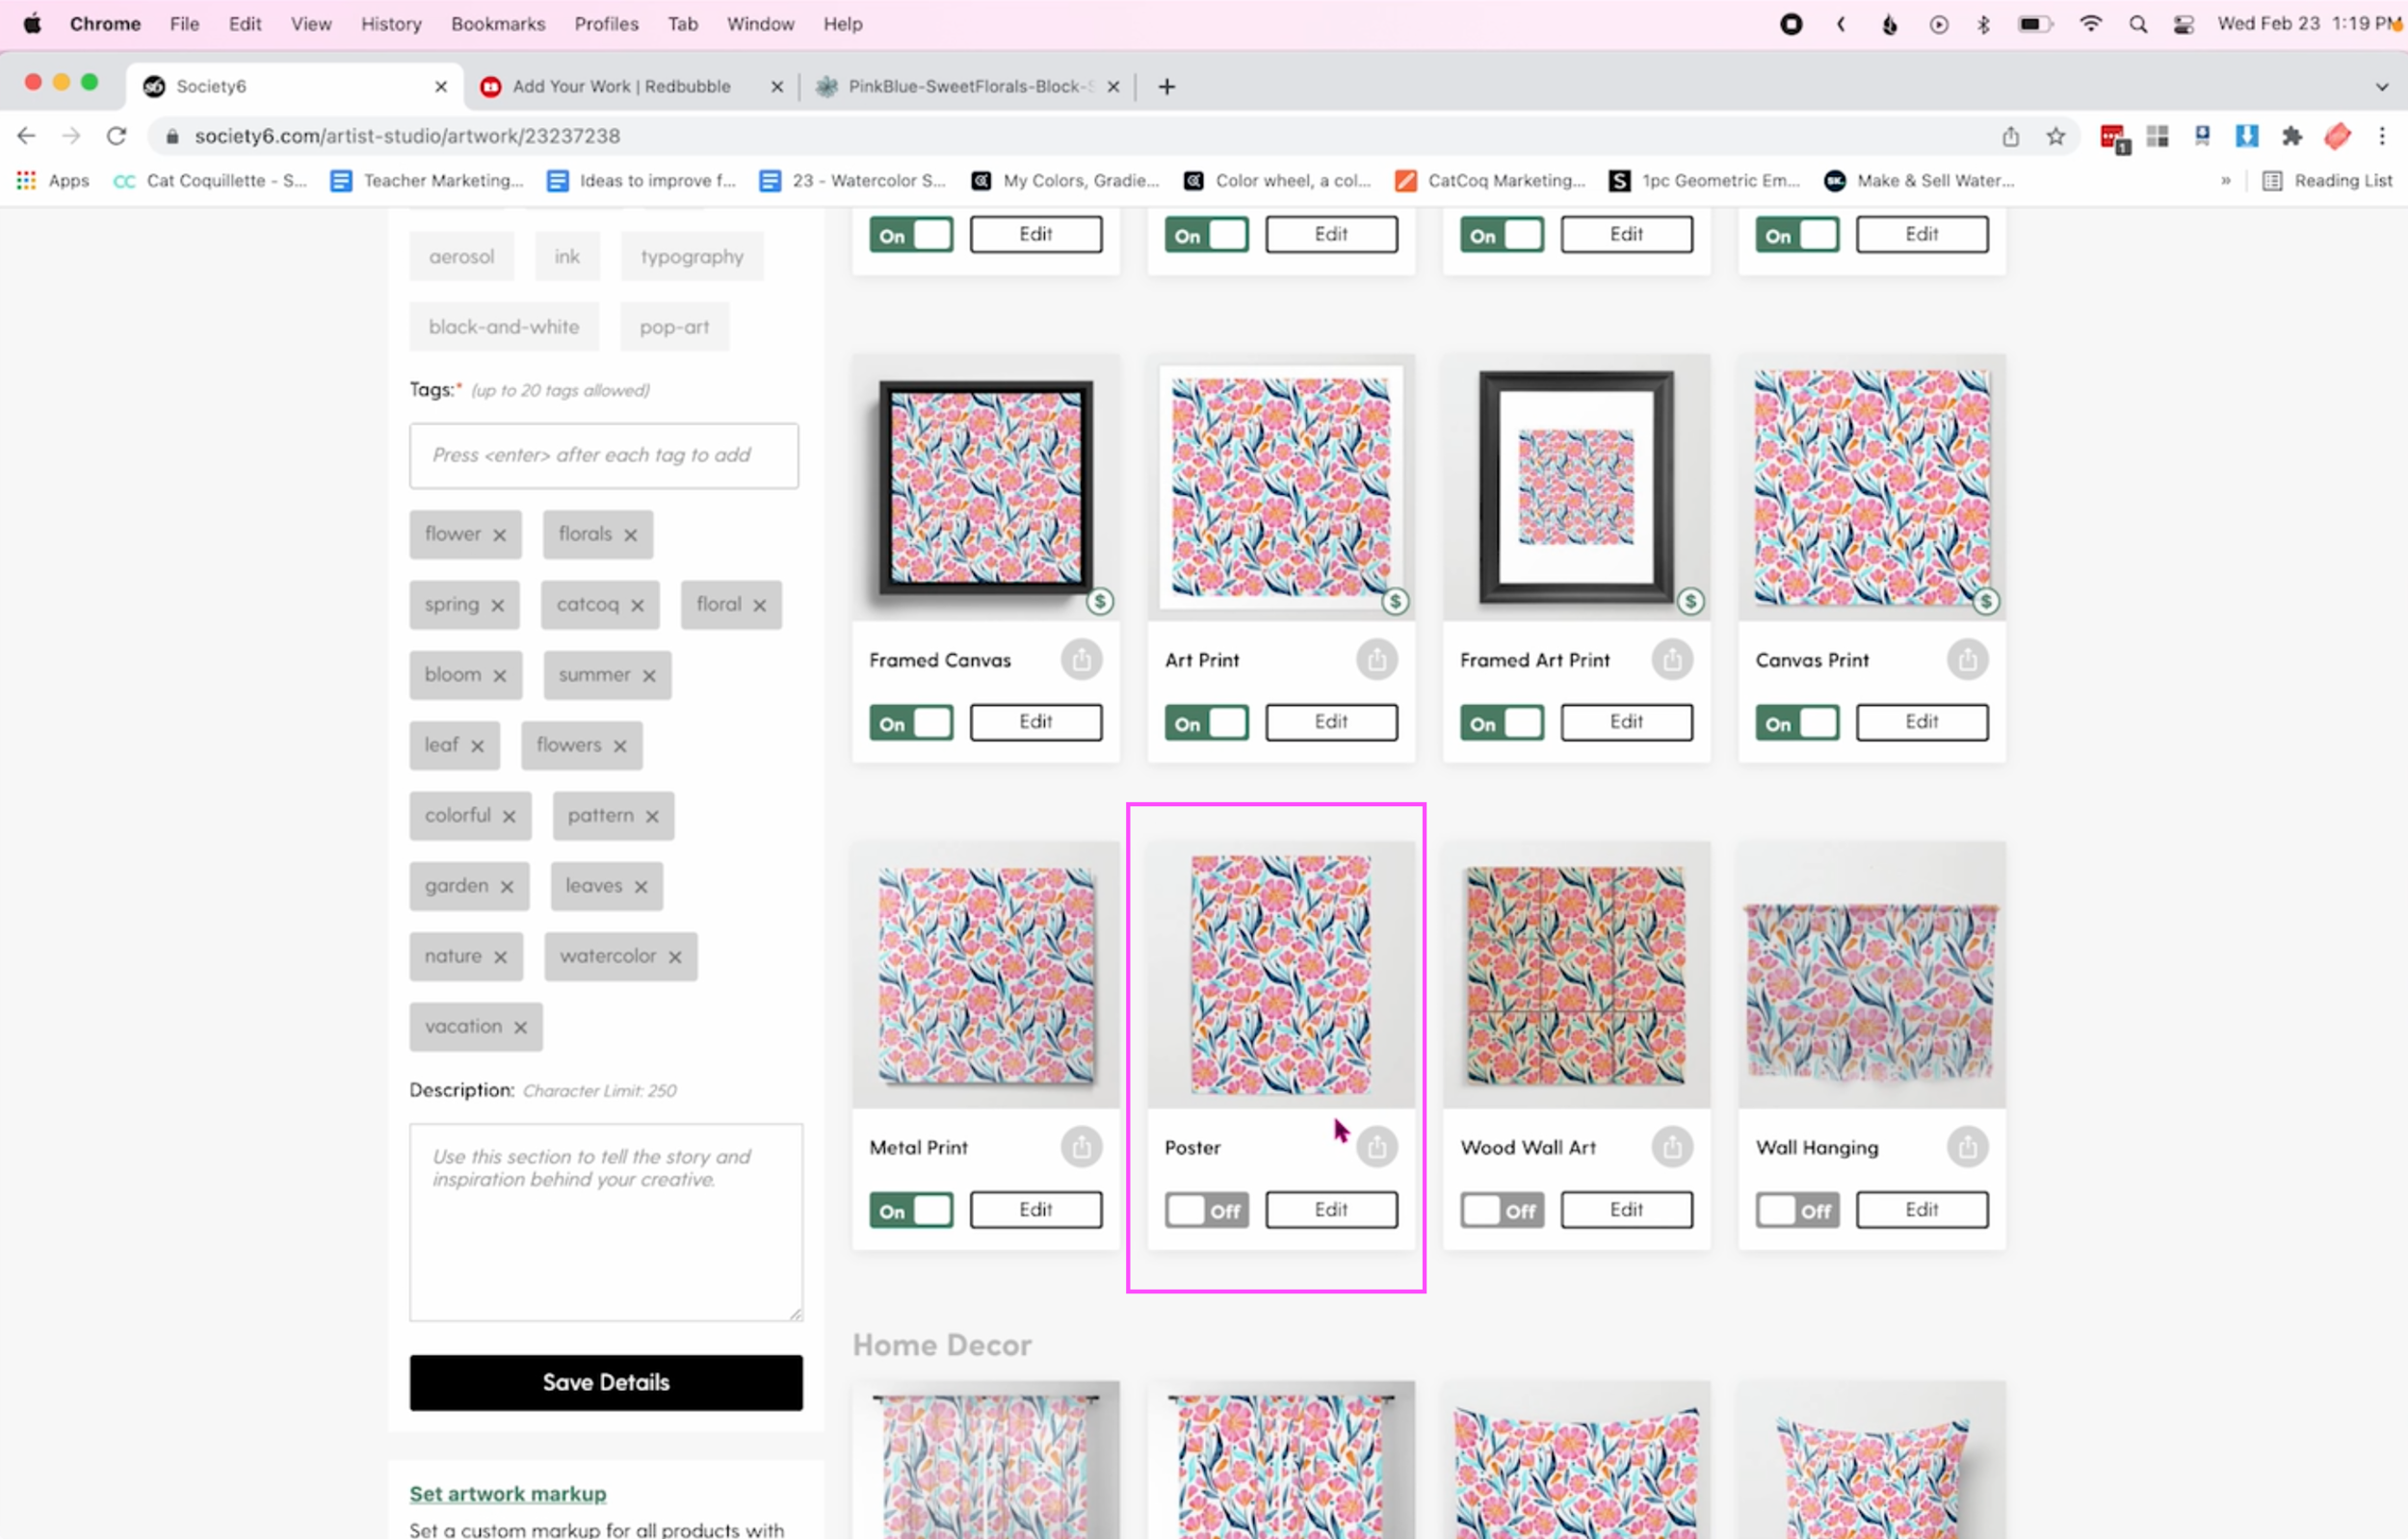
The next step is to add the category and keyword tags for your design. You’ll find these on the left side of the page. Keyword tags are any words that relate to what your artwork depicts. These are really important to include when you upload your design because many users will find your work by searching for keywords related to your design. I always make sure to use keywords in every piece I upload to help increase its reach and sales.

Now you can start to go through each product and modify it to make sure that your design fits the product well. Many of the products will be turned off by default, so you can toggle on any designs that you want to publish. My general rule of thumb is to publish as many products as possible since this gives you a better chance of someone finding your product and purchasing it. You want to make sure that the products are optimized for your design, so I’ll walk through some tips for how to edit your design to fit as many products as possible.
Enlarging your design to fit different products
In my example, I’ve uploaded a pattern, and I think it doesn’t quite fit certain products very well. I want to enlarge the design on some products so that it fits better with what you’d expect to see on that kind of product.
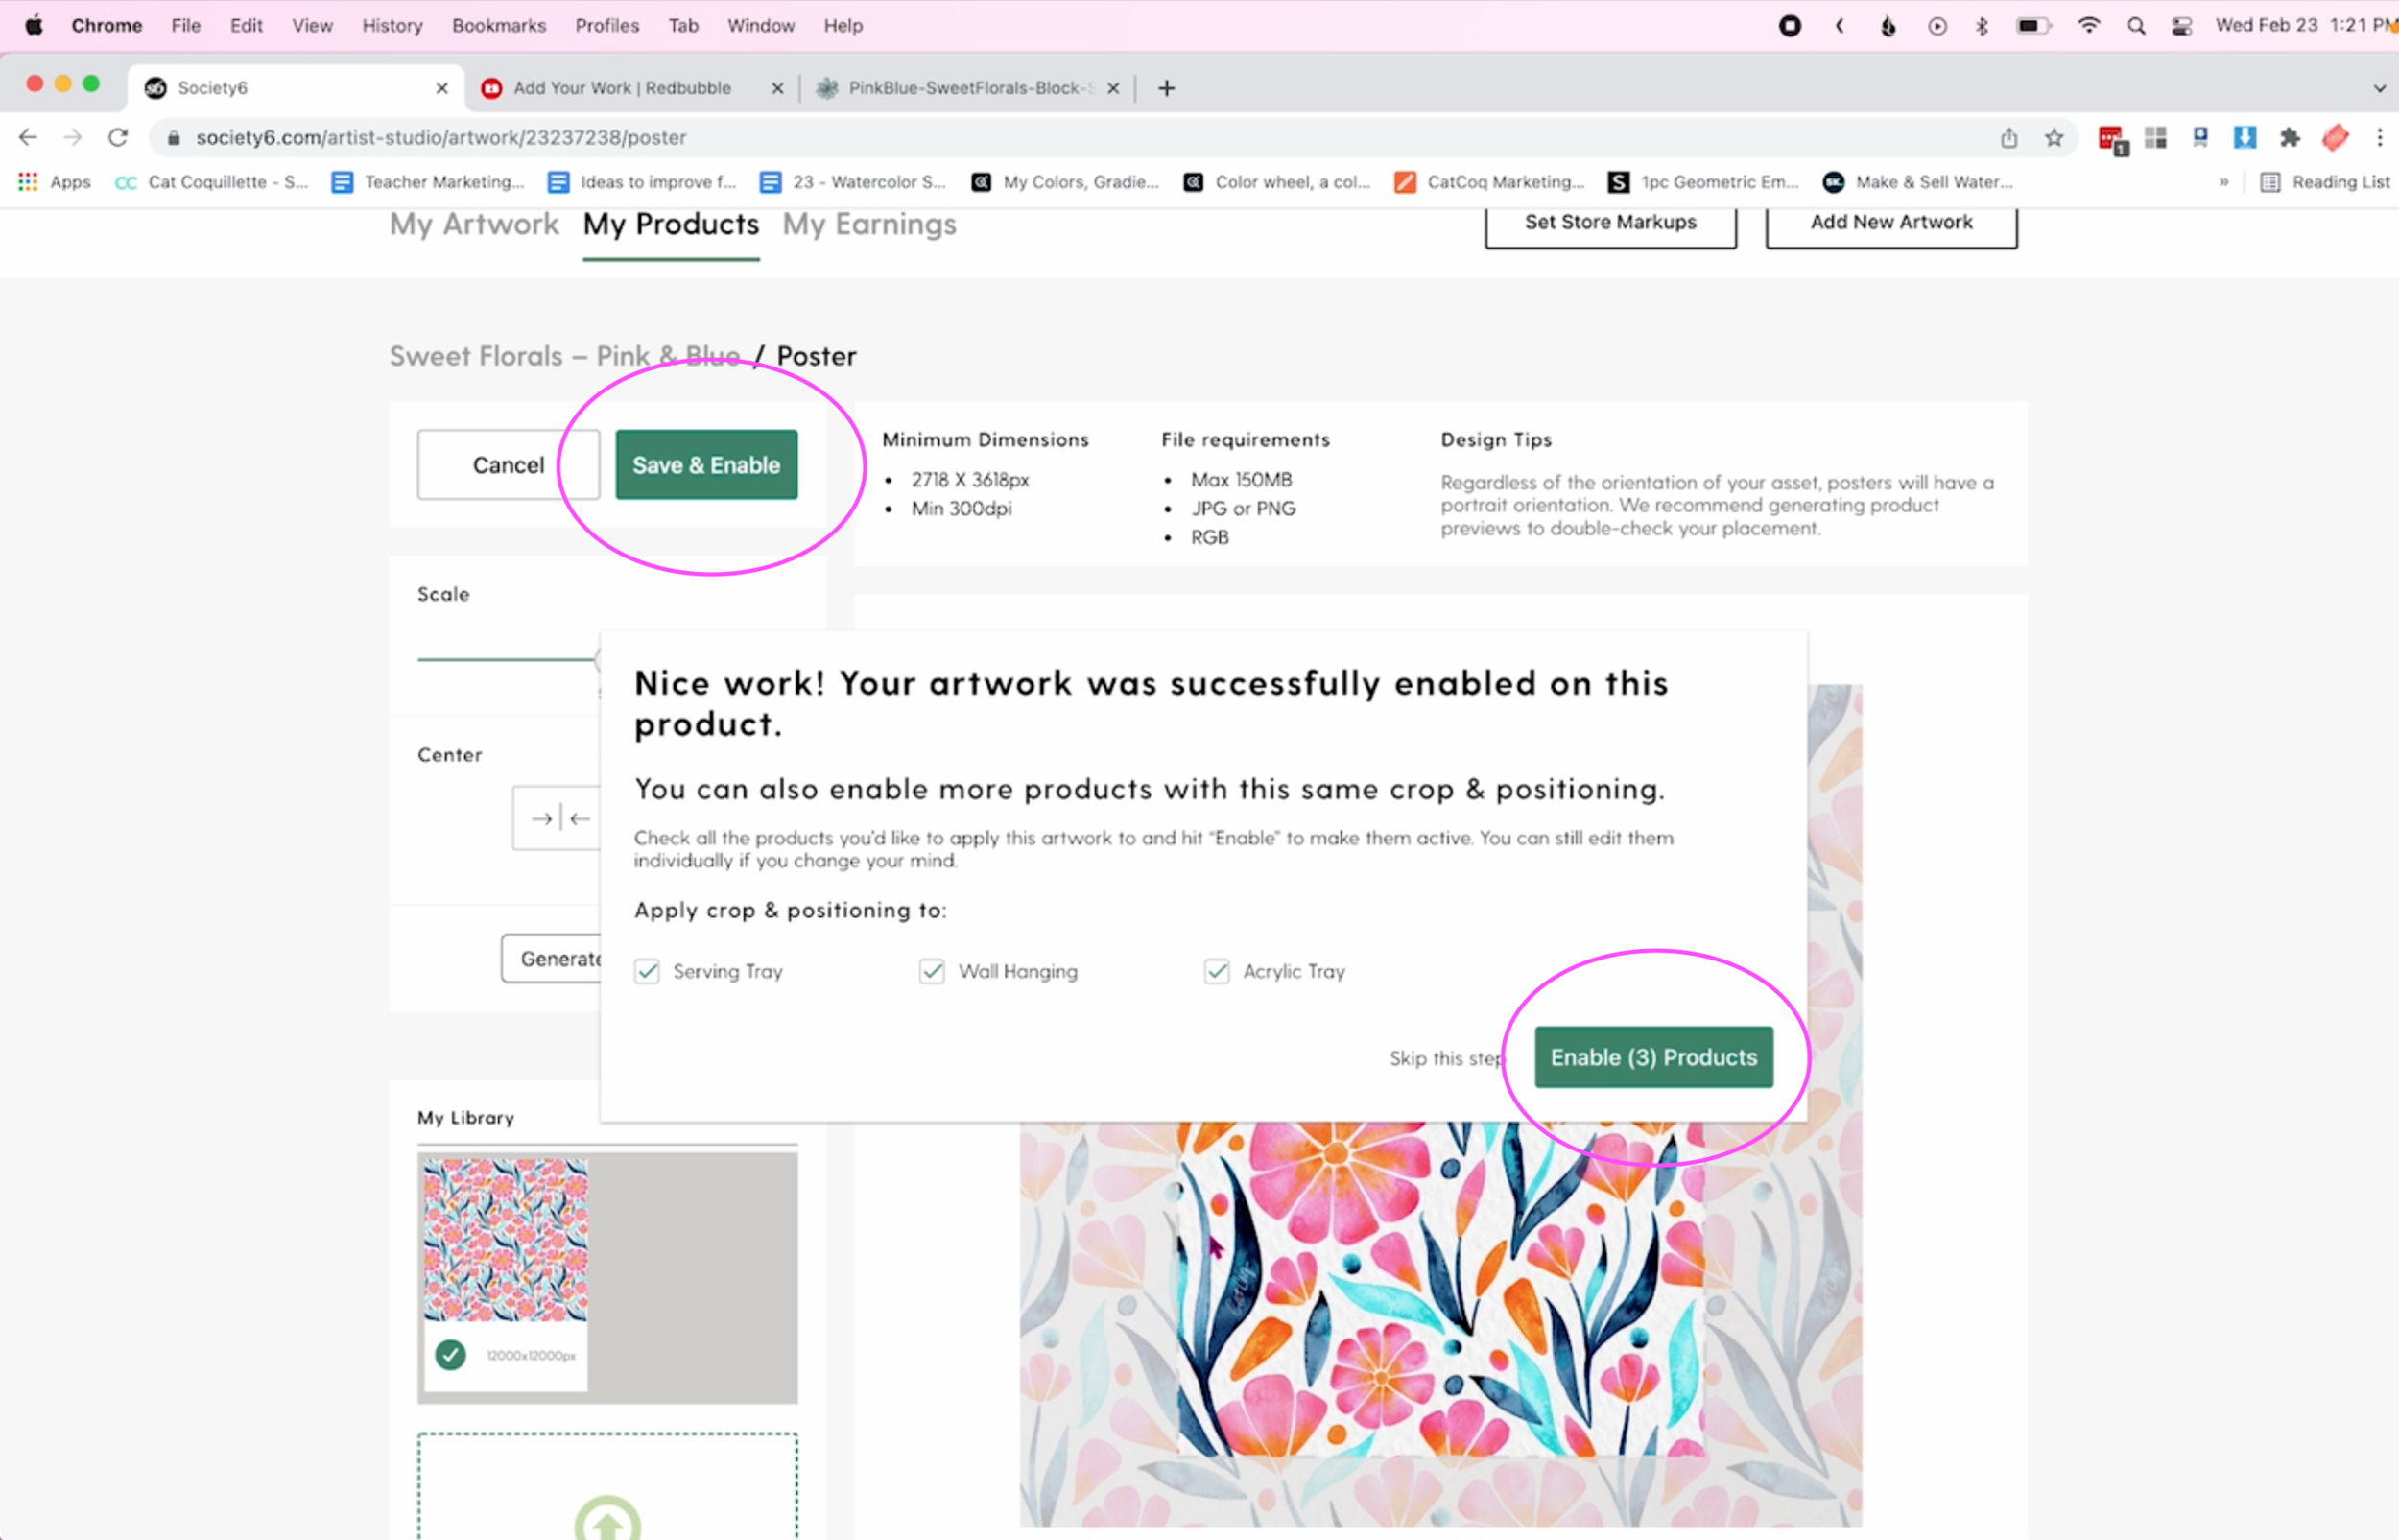
Click “Edit” to start making changes to the design. From here you can slide the scale up to make the design look more natural on the product. Note that Society6 will never let you scale the design past the point of its highest resolution, so you’ll always know that whatever you upload will be printed at the highest quality possible.

When you’re happy with the sizing, click “Save & Enable.” One of the coolest things about Society6 is that it recognizes that you will probably want to make this change on other similar products, so it allows you to do that with just a couple of clicks. Instead of having to resize this three more times, you are able to enable the changes on the other products it suggests.
From here I’ll continue the process of toggling on the products that are good to go, and making small edits on the ones that might need a little adjustment of the design.
Adding a repeat pattern for wallpaper on Society6
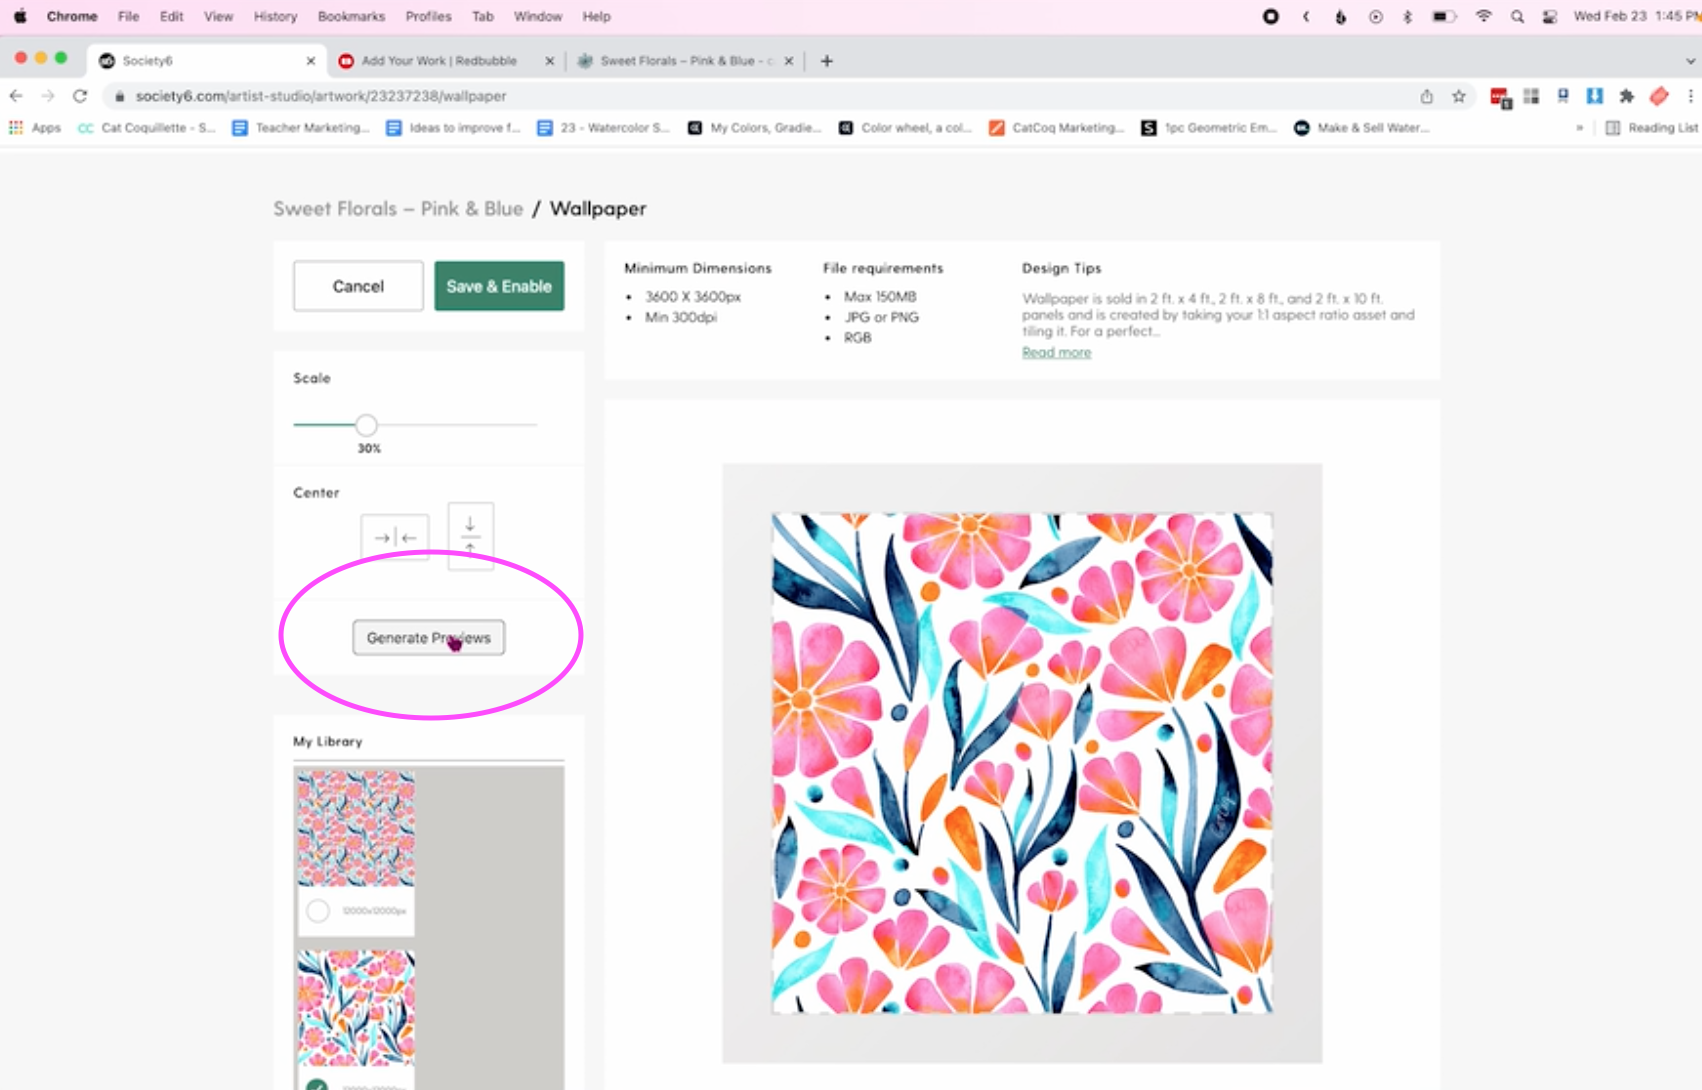
I mentioned earlier that wallpaper is the only Society6 product that requires a repeat pattern. If you’re working with a seamless or repeat pattern, but the file you uploaded for your other products is not a perfect repeat, there are a few small edits to make if you want to include wallpaper in your Society6 shop. When you scroll down to find the wallpaper product, click “Edit” to start making the adjustments.
Next, click upload and select the repeating block that you have saved of your repeat pattern. (Just a side note, if any of this terminology about repeat patterns is confusing to you, check out this post that dives into patterns in more detail!)

Once your block is uploaded you can click “Generate Previews” to see what it will look like on wallpaper.
If you’re happy with how it looks, click “Save & Enable” to enable that product in your shop!
Time to publish!
Once you’re done going through all of the Society6 products to make sure you’re happy with how your design looks, you can navigate to the “Publish Artwork” button on the left side of the page. And voilà! You have a whole slew of new products that are available for anyone to purchase!

How to Upload Designs on Redbubble
To get started on Redbubble, navigate up to your account on the top right of the page, and click “Add New Work.”

Then upload your artwork. Again, make sure this is a high-res file that can scale up to fit larger products without losing resolution.

Once it’s uploaded, add the title of the artwork as well as the product tags. These tags will be the key to helping your work get discovered when people are searching for topics related to your piece, so make sure to include them!
Now it’s time to go through the products! Redbubble functions similarly to Society6 where you can toggle on and off different products based on how well your design fits on them.

If you want to enlarge the image to fit the product better, you can do so by clicking “Edit.” Then, grab the scale and enlarge it to fit the product. Redbubble is great because it allows you to see these adjustments on the product in real-time. Unlike Society6, you’re not able to batch these adjustments so if you want to enlarge your design on multiple products you’ll have to do it for each product individually.

Adding a seamless pattern on Redbubble
There are certain products on Redbubble where a seamless pattern will work better. One of those is the duffle bags. I’ll walk through an example of how to upload a repeat pattern to Redbubble on this product.
To add your pattern block to a product click “Edit”, then click “Replace Image” to upload your pattern block.
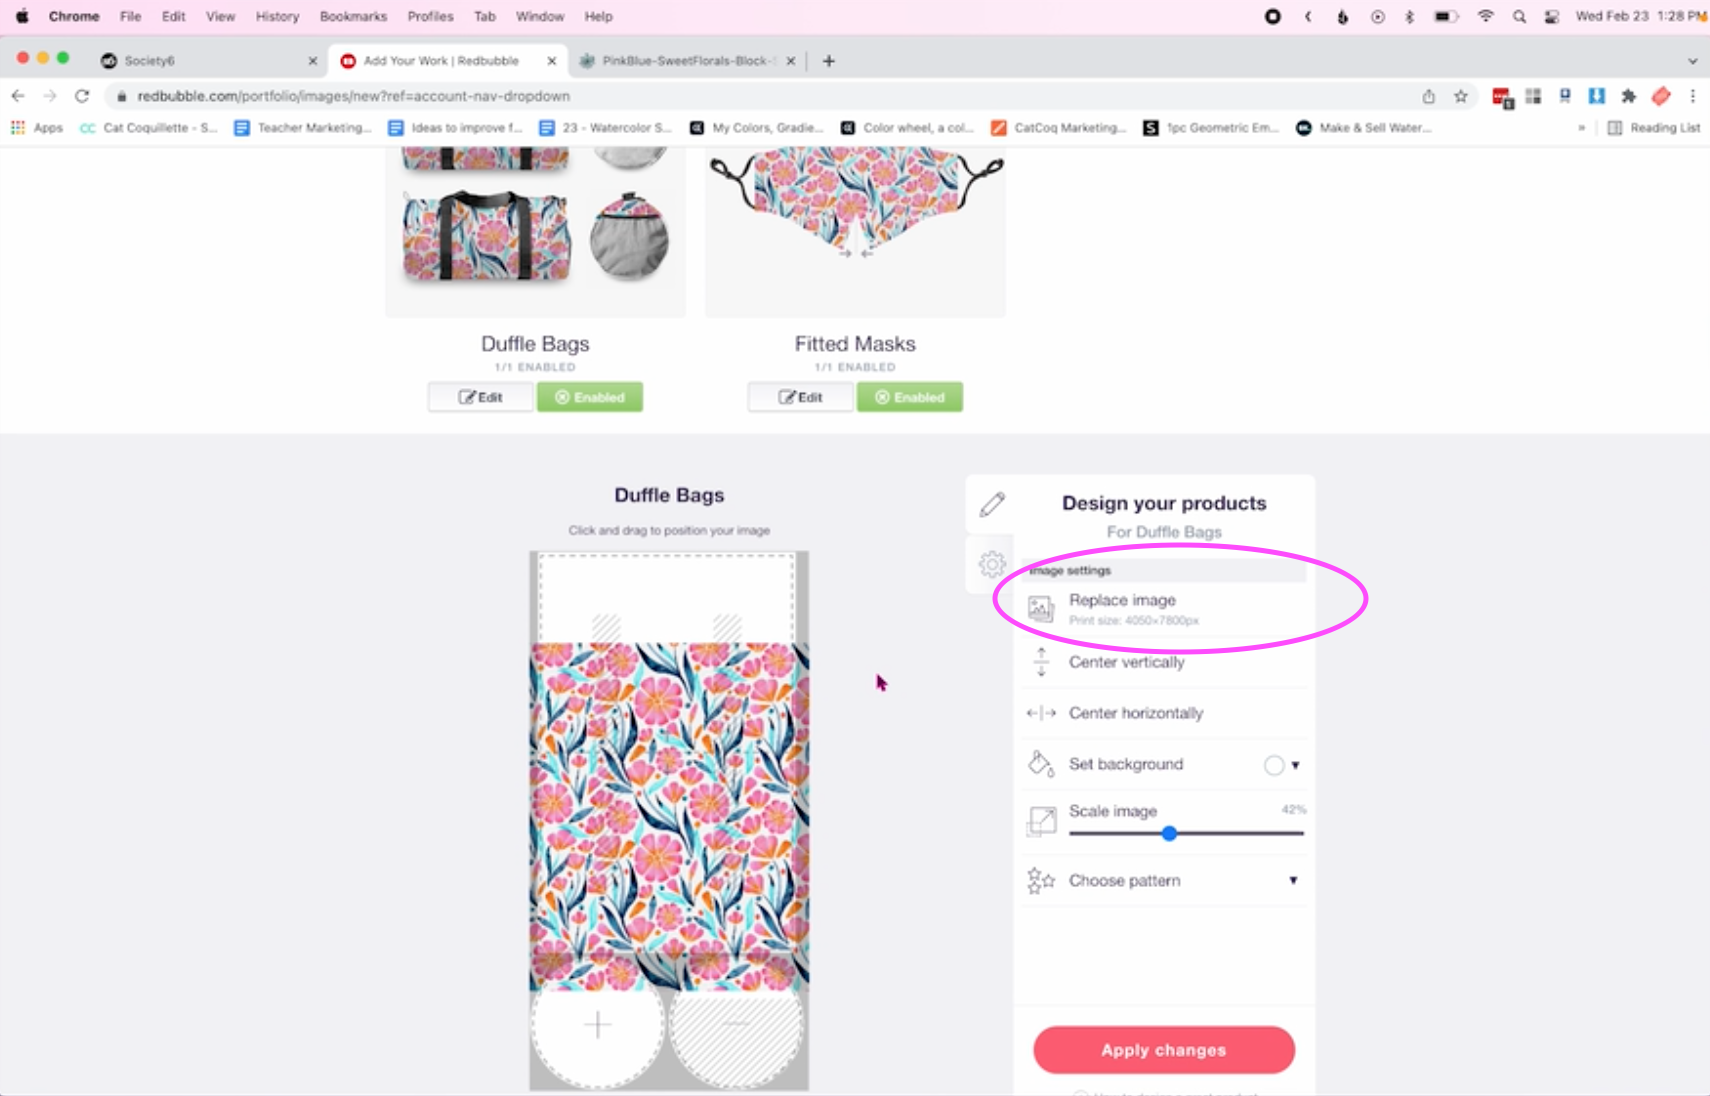
Once the block is uploaded, select “Regular Grid.”

From there you can use the scale to change the size of the pattern to fit the product.
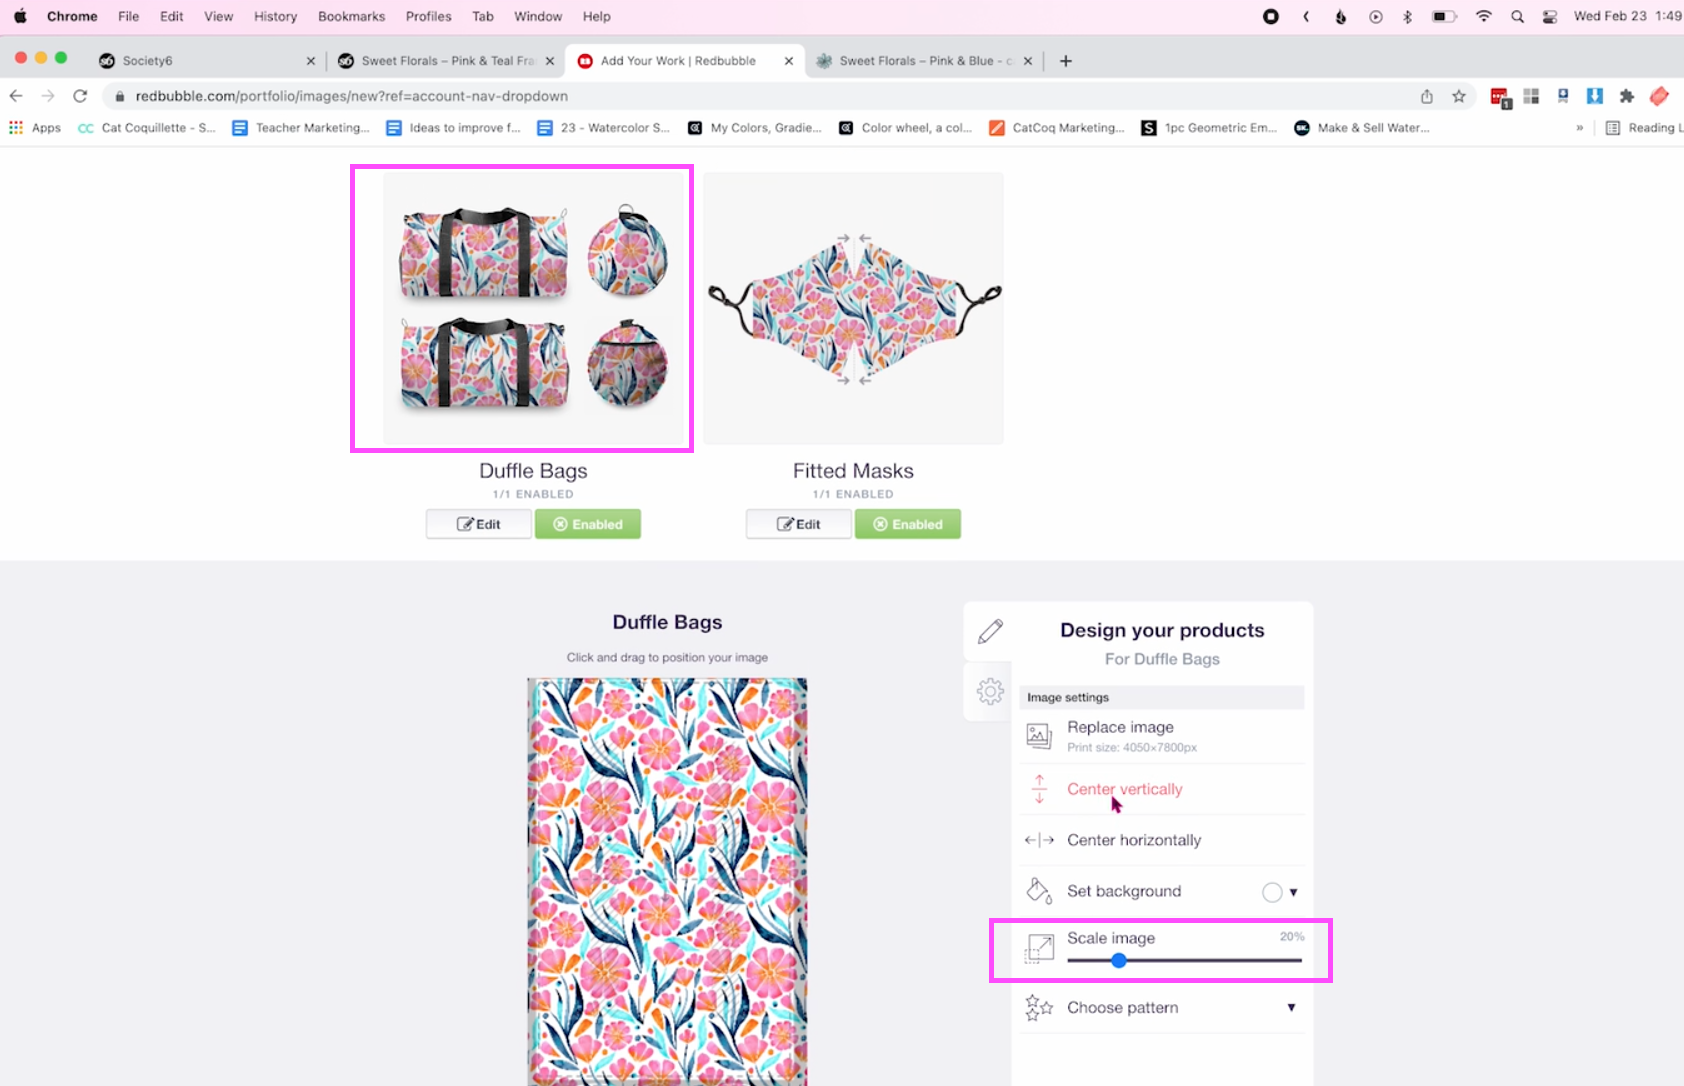
Once you’re happy with all of your Redbubble designs, scroll down to the bottom and click “Save Work.”

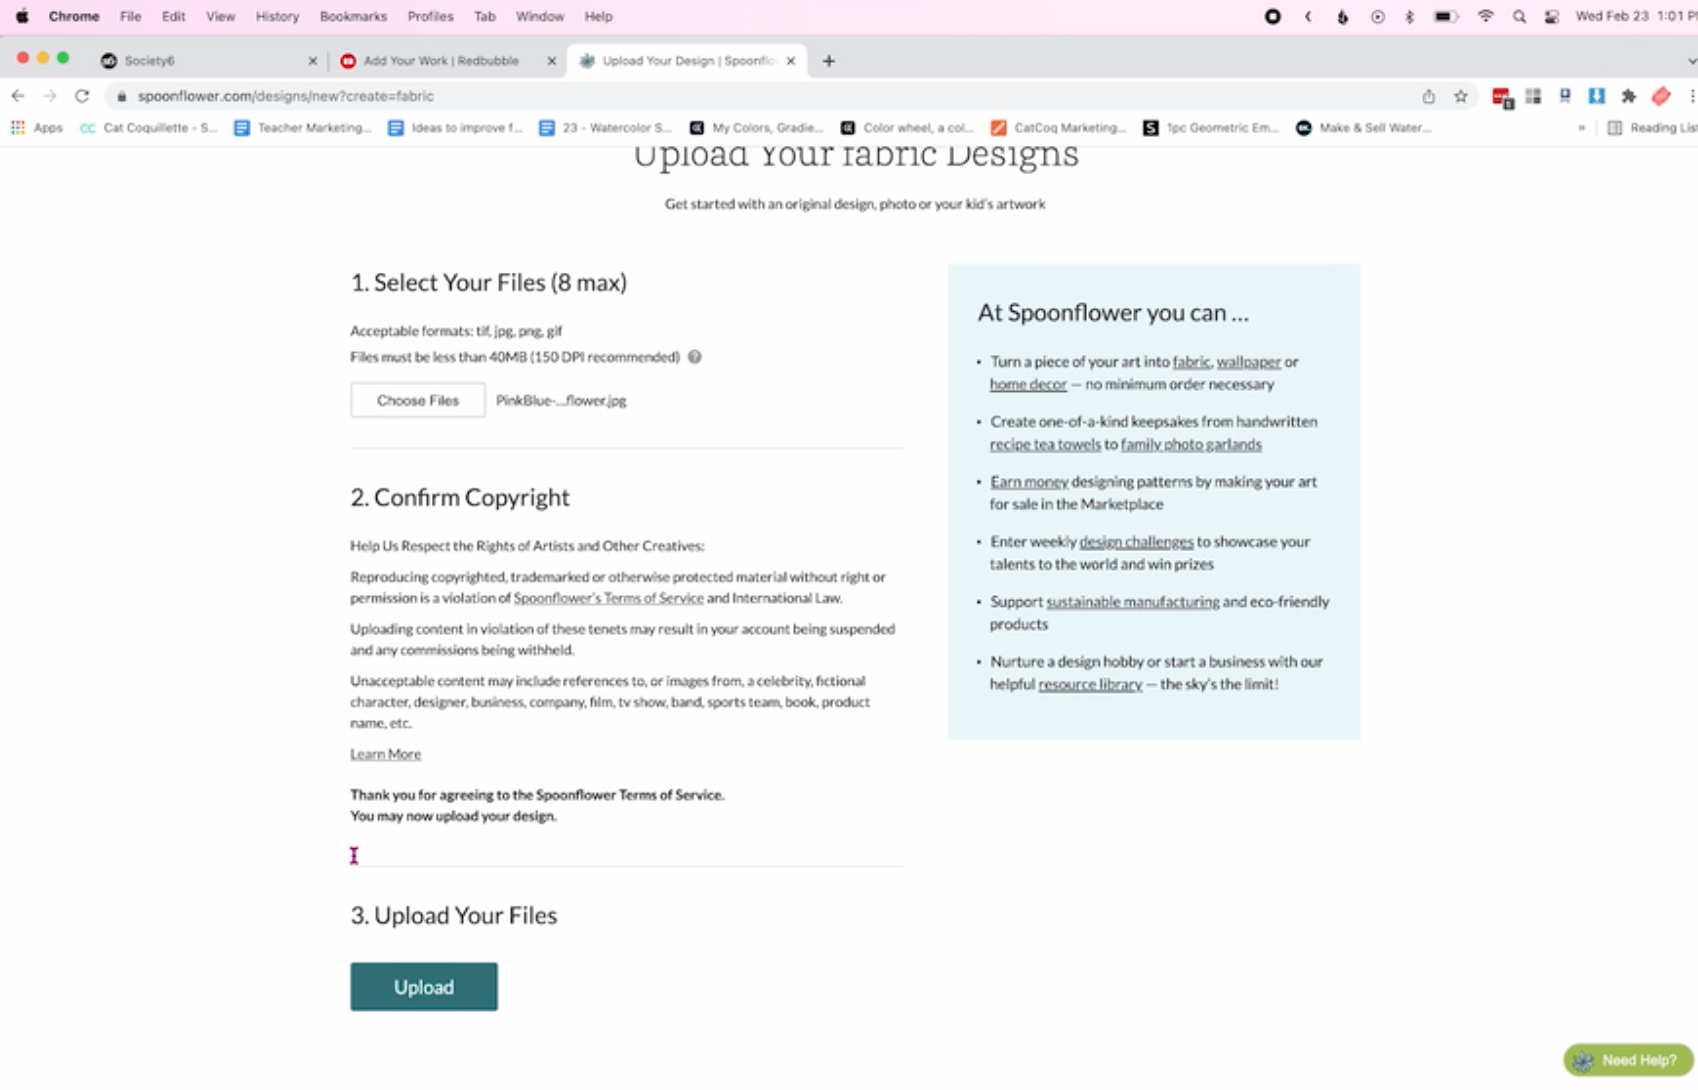
How to Upload Designs on Spoonflower
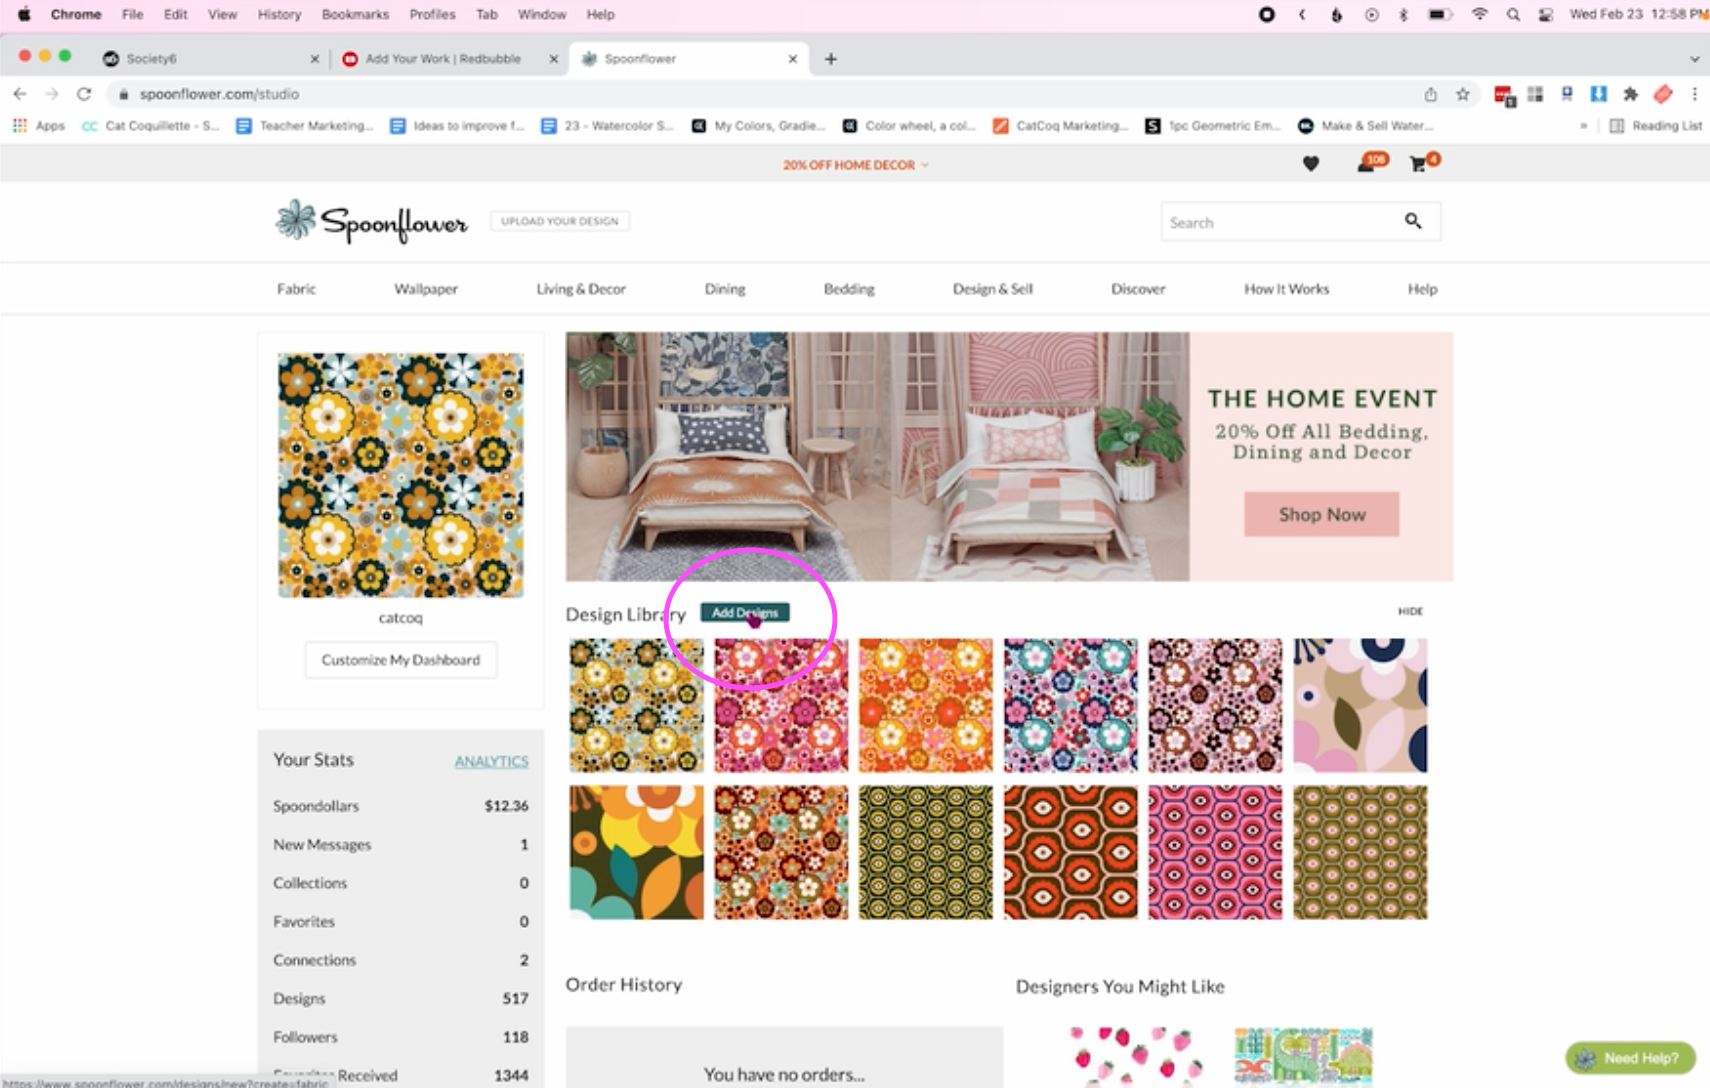
To start uploading to Spoonflower, click “Go to your dashboard.”

Then click, “Add Designs.”
An important note about Spoonflower is that your design files have to be less than 40MB. I tend to work with really large files, so I almost always have to resize my files for uploading to Spoonflower. I typically resize the file in Photoshop and save it as a separate file just for Spoonflower.
The majority of Spoonflower products are for repeat patterns, so I always upload a pattern block to Spoonflower. With your smaller pattern block file ready, you can click “Choose Files” then confirm your copyright and click “Upload.”
All of these print on demand sites have a very similar process once the design is uploaded. Just like with Society6 and Redbubble, you’ll want to add a title for your artwork as well as the product tags that will help it get found in searches. To make this simpler, I keep my titles and product tags consistent across all print on demand sites.

Now it’s time to see what the pattern looks like on products. It can be hard to visualize what the pattern will look like just by looking at the swatch that Spoonflower provides, so I always like to open “View All Products” in a new tab to see what it will look like.
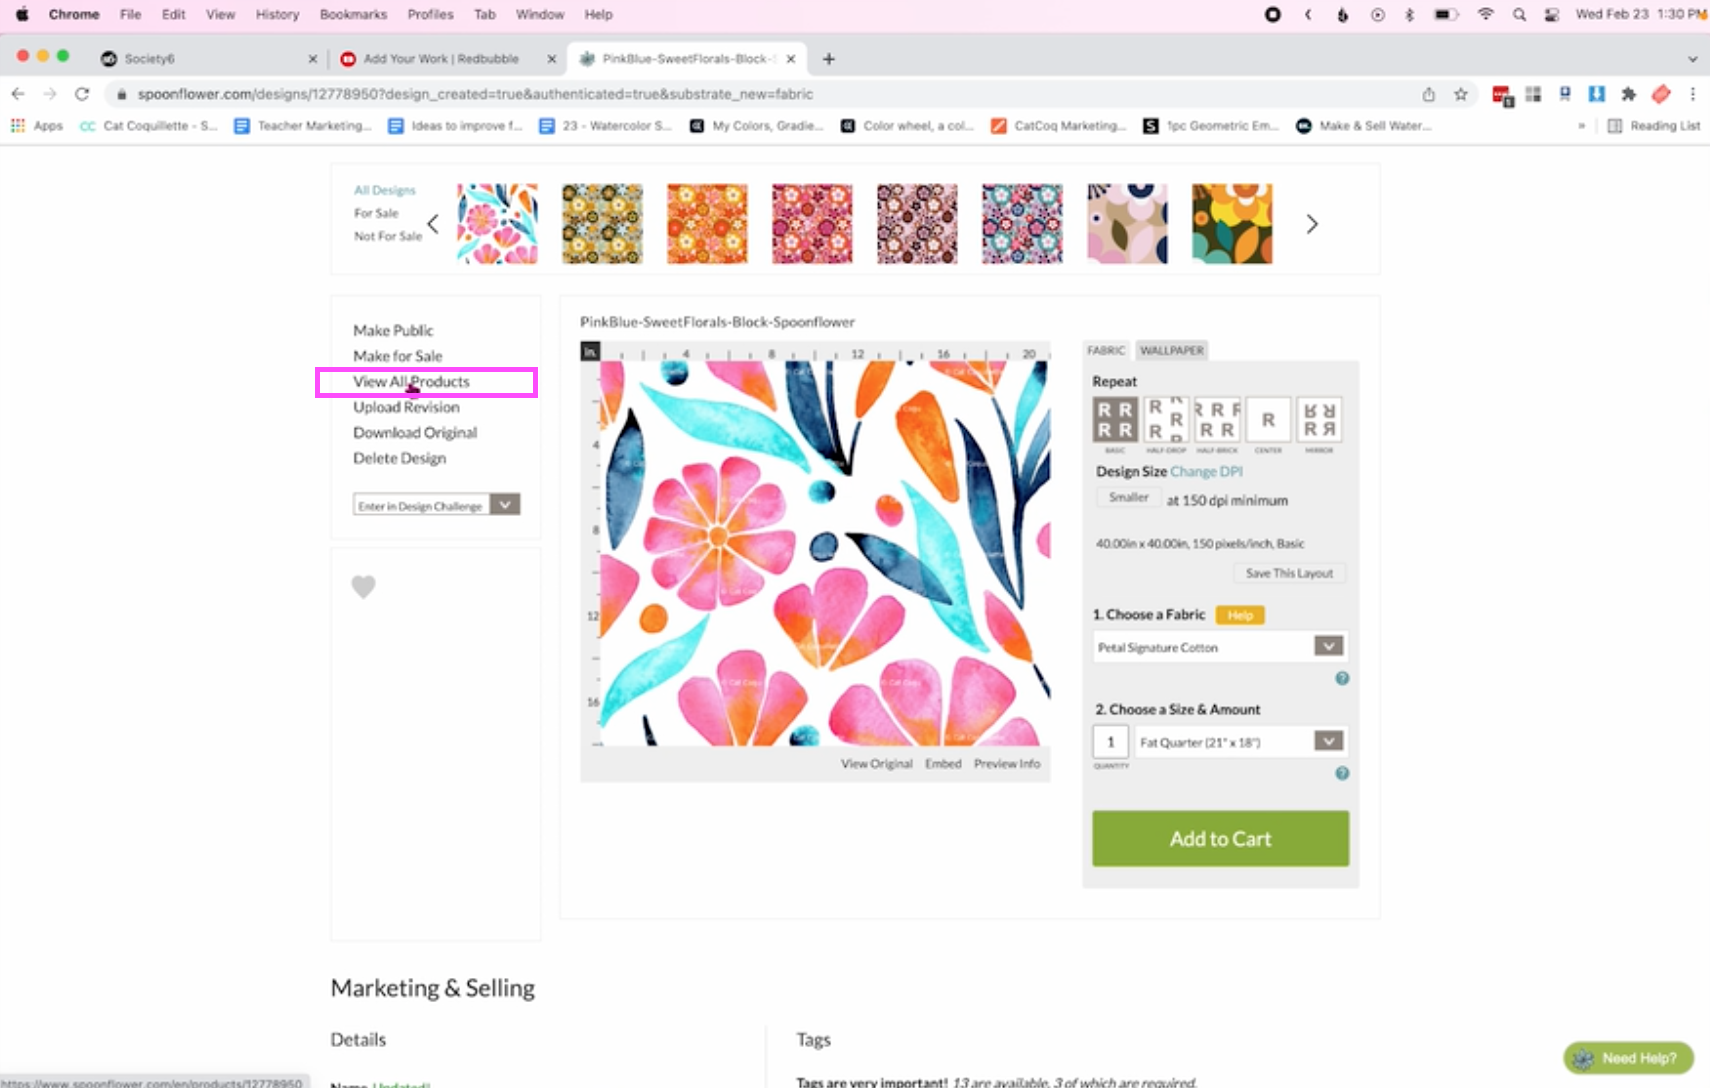
In my example, the pattern was looking way too big on certain products. Now I can take that knowledge and go back to make adjustments.
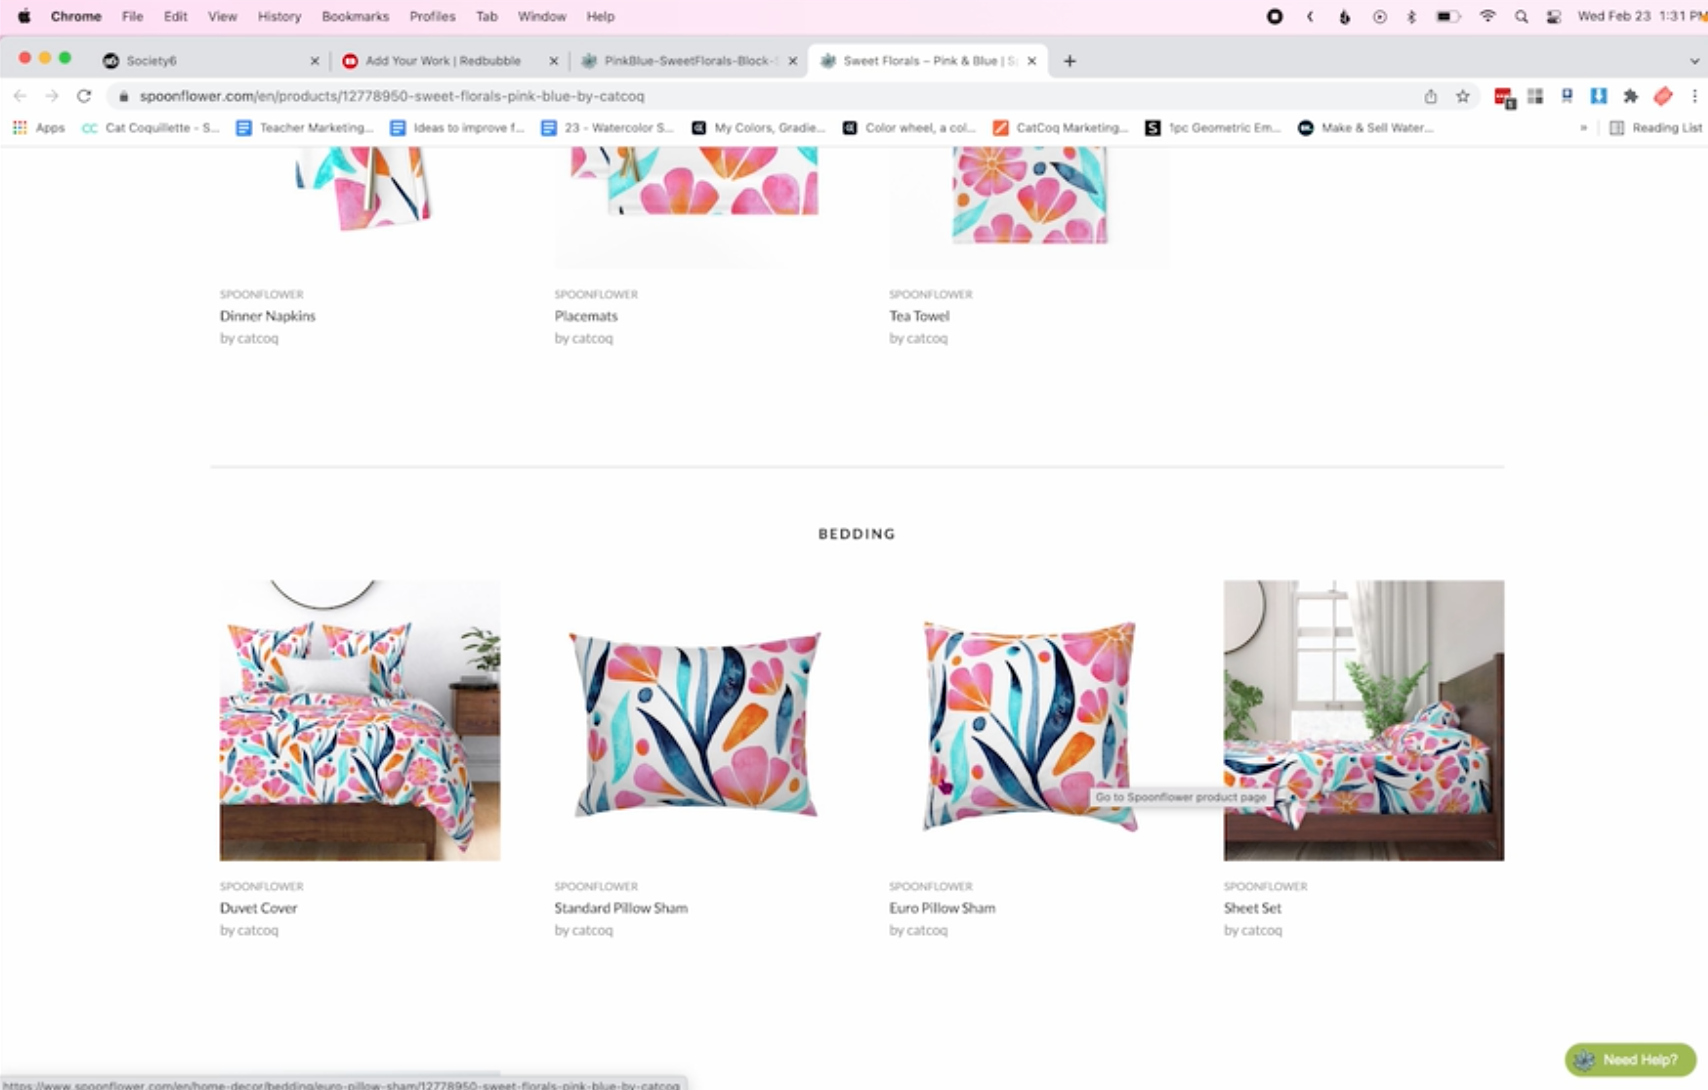
To adjust the size of your pattern, navigate back to the page with the pattern block, and click “Smaller.”

When you’re happy with the size of the pattern click “Save Layout.” Now you can go back to “View All Products” to see what your adjustments look like on the products themselves.
When you’re happy with the size of the design, you’re ready to order a sample swatch. Spoonflower is a little different than Society6 and Redbubble because in order to publish your design you must purchase a sample swatch from them. The reason for this is that seamless patterns are tricky to make, and Spoonflower wants to make sure that it will actually line up and repeat seamlessly on their products. So the final step with Spoonflower is to order the swatch and approve it before your products will be published.
And there you have it! The upload process for Society6, Redbubble, and Spoonflower! As I mentioned above, I get into a flow where I’m uploading the same design to all three of these sites at once. If you want an in-depth look at how that process works, check out my class Surface Design in Adobe Photoshop for Print-On-Demand.

Selling your art online can be so rewarding and I am so proud of you for taking this step in growing your creative business! I am wishing you all the best on your print on demand journey!
More CatCoq Classes:

Trend Forecasting
Are you ready to create artwork and designs that will become insanely popular and earn you passive income for months or years to come? This class will help you do just that by learning how to key into upcoming trends.

Step-by-Step Guide to Art Licensing
Want more strategies for standing out on print on demand sites and monetizing your art side hustle? This class is filled with actionable steps to help you make your first sale with artwork online.

Growing Your Creative Business Through Instagram
One of the best ways to market your artwork is with social media. This class will help you grow your brand successfully on Instagram, tailored specifically to visual creatives.